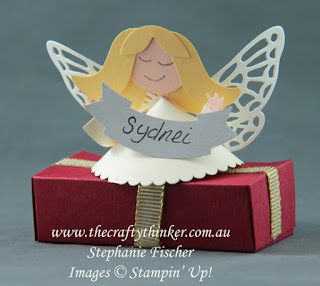
Welcome to the Ink It! Stamp It! Design Team Blog Hop - we hop every month so be sure to pop back and visit us again! Today our theme is: 3D Project.
You are currently at my page - Stephanie Fischer, The Crafty Thinker. At the end of my post there is a full line of team members, please click on the name after mine in the list to continue the hop.
I'll be honest, 3D projects are not generally "my thing" but I do like to make something for the Christmas table every year - so here goes!
 |
| A couple of trays of angels ready for the Christmas table! |
 |
| A little 3D angel place name holder for my Christmas table |
I always like to make something for each table setting that has the place name and a little gift inside. Last year it was lip salve, this year I've returned to chocolate!
These are the ingredients for the angel: the largest of the scalloped Layering Circles dies, the wings from the Springtime Impressions dies, 1" circle punch, Duet Banner Punch, Fox Builder Punch.
The colours I used are: Very Vanilla, Whisper White, Petal Pink, Smoky Slate and So Saffron. This is a great way to use up that collection of little leftovers!
 |
| Ingredients for the 3D angel place name holder |
 |
| This angel is waiting to go on top of the little box that I'll fill with chocolate - but at the last minute so it doesn't melt in the Christmas heat! |
Instructions:
- For the dress/body Make a cone from the scalloped circle by cutting to the centre, wrapping and gluing.
- Assemble the head next:
- Attach one end of the Petal Pink strip to the back of the Petal Pink circle.
- Attach one of the So Saffron Fox Builder tails to the top of the head at the front.
- Repeat on the other side.
- Attach the fringe.
- Draw on the facial features as desired.
- Attach the remaining pieces of hair to the back of the head, placing glue only at the top of each piece.
- Glue the So Saffron circle to the back of the head.
- Glue the "neck" to the seam in the back of the dress, gently bending the head back to a good angle.
- Use a bone folder to gently curl back the wings a little.
- Slip the wings under the centre two pieces of hair at the back of the angel. Glue the wings to the back of the dress, covering the neck attachment.
- Glue a "hand" to the top of the cut edge of one half of a Very Vanilla Duet Banner

Glueing the hand between the two sides of the sleeve 
The finished arm
- Glue the other half of the banner "sleeve" to sandwich the hand.
- Glue the sleeve to the dress, gently bending the arm out a bit.
- Repeat with the other arm.
- Write the place name on the Smoky Slate banner.
- Place a glue dot to the back at bottom centre of the banner .
- Position the banner in an appropriate position in relation to the angel's hands and gently press to adhere glue dot to the dress.
 |
| The derriere of the 3d angel place name holder |
 |
| This view shows the arm attachment |
TIPS:
- If, like me, you're making a lot of these - work in batches (cut everything, assemble all the heads, wrap all the dresses etc)
- When cutting elements from the Fox Builder Punch, use strips of cardstock to save wastage. EG When cutting the hair, I used 3/4" wide strips which I fed into the punch from the right.
- Using strips of cardstock will also help save wastage when using the Duet Banner Punch.
- For perfectionists - consider cutting two "sleeve" banners together (having carefully aligned them). This way you can be sure that the "sleeve sandwich" will perfectly match when you glue them together with the hand between.
 |
| The angels will be attached to little boxes containing chocolate |
 |
| I'll have to add the chocolate at the last moment so that it doesn't melt in the summer heat! |
Thank you so much for joining us today and we hope you'll join us again next month! I'm Stephanie Fischer and to keep hopping around see the list below to see who is up next with another great project.
Thanks for visiting
'Til next time
Stephanie
Product List - All available in my online store


Awhhh...so sweet. Love her wings! You're so creative, Steph! Hugs to you!
ReplyDeleteIt's you who are sweet! Thank you, RaeDeen and hugs to you too!
DeleteVery cute! So creative with all of those punches and die cuts! :)
ReplyDeleteThank you, Amy!
Deleteoh my goodness, 3-d is definitely your thing, these little angels are adorable, how very creative of you
ReplyDeleteThank you, Sandi! You're very kind!
DeleteOhhh here are gorgeous! Thank for sharing all the cut out pieces to use - fab fab fab!
ReplyDeleteThank you, Carolina!
DeleteAdorable!
ReplyDeleteNancy Jr
Thank you, Nancy.
DeleteOh I love your little angels Stephanie, they are gorgeous x
ReplyDeleteThank you so much, Angela!
DeleteWhat cute table decorations Stephanie :) 3D punch art, Love it!
ReplyDeleteThank you, Kirsten!
Delete