 |
Flowers For Every Season Memories & More Card Pack and
Flowers For Every Season Memories & More Cards & Envelopes:
|
Warning - this blog post will be long and very image-heavy! I've been playing with the Flowers For Every Season Memories & More Card Pack and coordinating Cards & Envelopes. In a very short space of time, I'd created, I think, a dozen lovely cards, including some pretty Christmas cards (scroll down)!
It occurred to me that it's a great place for the beginner to start and then I've gradually stepped up the cards along with suggestions for gradually building a card-making stash of products and tools.
For the group of cards above, I added nothing more than some adhesive - simple but very pretty and no need for any tools or other supplies.
 |
The Memories & More Card Pack includes stickers
and some greetings that can be cut out and stuck on separately with some glue
|
Then I added a stamp set (for some greetings) and an ink pad. (Depending on the type of stamp set, you may need to add an acrylic stamp block or two). For the cardmaking beginner, this is a good way to evolve creativity and start building a stash. To stretch your budget as far as possible, look for a stamp set with images that you like as well as a good, versatile greeting or two.
 |
I added a stamp set and an ink pad to make this pretty card.
I used Just Jade ink to coordinate with the cards
|
The next step in the evolution was to add some pretty layers which requires the addition of some cardstock (I used the 2020-2022 In colour A4 cardstock pack) and a cutting tool to the stash. I really love my Stampin' Up Paper Trimmer that cuts and scores and is the most effective and reliable trimmer I've owned in my stamping lifetime and it's reasonably priced. However, a craft knife, steel ruler and suitable cutting surface would suffice.
 |
I used both a large and small Memories & More card, made a base card from Misty Moonlight cardstock and cut some layers from Bumblebee cardstock.
|
For the next card, I used the Misty Moonlight cardstock to add a layer to the card and also added a greeting stamped with Misty Moonlight ink. On this occasion, I used a Stampin' Write Marker as I only wanted to ink up part of the greeting on the stamp (see below).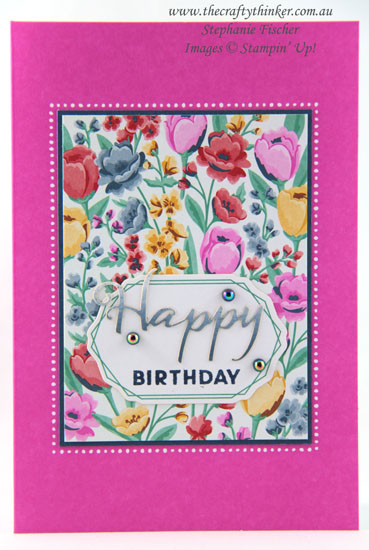 |
I added a layer of Misty Moonlight cardstock and a partially inked greeting
|
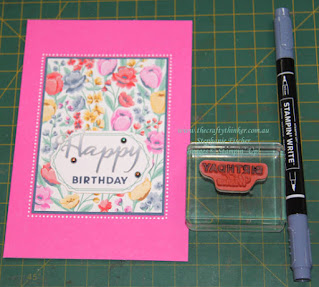 |
I used the Misty Moonlight Stampin' Write Marker to add ink to part of the stamp
|
The next card uses ink in another of the 2020-2022 In Colours and some Blue Adhesive-Backed Gems - it's never too soon to start building an embellishment stash!
 |
This Memories & More card required a little trimming before I added it to the
Bumblebee base card I'd made. I added a stamped greeting with Cinnamon Cider ink |
Now it's time for a bigger jump in the cardmaking evolution - some die cutting! This requires the addition of a die-cutting machine to our growing set of tools but it's the gateway to a newfound creative freedom that's truly exciting! With one of these machine you'll also be able to use embossing folders and then learn cool and nifty techniques like embossing with your dies ... but that's for another time!
 |
I added a bit of die-cutting to this card, using Silver and Balmy Blue Glimmer Paper
and dies from the Beautiful Boughs and Poinsettia sets |
Stampin' Up's Stampin' Cut & Emboss Machine is competitively priced and comes with all the plates you'll need along with easy to follow instructions. It's strong and well-balanced and folds for carrying (sometimes we want to craft at a friend's house!) or to take up a small footprint on the table. It's available for purchase from 1 September 2020.
Now that we're die-cutting, we can start to look at Bundles to save ourselves 10% on coordinating stamp sets and dies! We can get that lovely dimension onto our cards without going to the effort of fussy-cutting around the images!
 |
This card adds some heat-embossing to list of techniques. I've used the Poinsettia Petals Bundle and some gold and white heat embossing. I also added an embellishment from the Forever Gold Specialty Paper and a Beaded Pearl embellishment
|
Well, I think it's time we added heat-embossing to our skill set. For this, we'll need to add a heat tool and a Versamark ink pad to our growing stash and some embossing powder in the colour of our choice. The metallics are always a good place to start, because it's hard to get that effect with an ink, followed by clear, black and white.
Heat-embossing, rather like adding a die-cutting machine, opens the door to whole range of creativity and possibilities. Many cool and fun techniques involve some heat-embossing.
 |
| Let's start building a ribbon stash! To my Poinsettia Petals Bundle, I've added some Snowflake Splendor and Basket Weave & Metallic Combo ribbons |
I also added some Cherry Cobbler and Shaded Spruce cardstock to the stash for these poinsettias and increased the embellishment stash with some Beaded Pearls and ribbons. I never pass up a good ribbon! I have loads of it in my craft room that I've collected over the years because it goes a long way! These days I only buy Stampin' Up ribbons because I know they coordinate with the inks and papers - it's effortless!
Well, that was a very long-winded way of letting you know that I think the gorgeous Flowers For Every Season Memories & More Card Pack and Cards & Envelopes make an inexpensive and beautiful starting place for craft collection (or a great addition for the time-pressed avid crafter like me!).
You can certainly build your craft stash in a different order, depending on your priorities and crafting interests - the point is, you can take it slowly - just add a little bit at a time - and your hip pocket won't suffer too much!
Thank you for visiting.
'Til next time!
Stephanie
Product List - All products available for purchase from my online store
