Pages

Sunday, 29 September 2019

Floating Frame #Elfie and Beautiful Boughs - a Christmas Card

#thecraftythinker  #stampinup  #cardmaking  #christmascard  #elfie  #floatingframe  #peacefulboughs , Peaceful Boughs, Christmas Card, #Elfie, Floating Frame, Stampin' Up Demonstrator, Stephanie Fischer, Sydney NSW
#Elfie on a floating frame of Peaceful Boughs
So, I sort of missed the boat with the "floating frame" phenomenon.  I saw a couple of cards, liked them and ordered some of the Press and Seal that I heard was essential and then my life took a bit of a turn and floating frames were forgotten!  

The other day I came across the unused Press and Seal in my cupboard and decided it was time to do something with it.  Of course, the sensible thing would have been to look for some tutorials or instructions but apparently I'm not sensible!  I winged it!  So this is probably not a true floating frame card.

I wanted to keep some of the branches looking organic (since they're cut from Copper Foil I can't really use the term "natural").  I also wanted to use a bit of the gorgeous Brightly Gleaming paper and (with the great benefit of hindsight) I've worked out a better way of achieving the look I wanted.

I should have cut a rectangle of Brightly Gleaming paper with the correct external dimensions.  Then placed that, face down, onto the sheet of Press and Seal.  Having cut the foliage from the Copper Foil, the next step should have been to arrange the foliage - using a little adhesive or sticky tape to keep the foliage attached to the frame later) and then flip it face up onto a cutting mat.  Then position the smaller rectangle die to cut.

I used little pieces of Stampin' Dimensional that I cut from the edges of the sheet and placed them in strategic places so that the foliage and frame would be elevated from the surface of the card.
TIP:  I found it easier to remove the protective layer as I worked so that I knew that all of the little bits of dimensional were ready to stick.

I added a layer of Very Vanilla cardstock to the Pretty Peacock base card and then adhered my leafy frame, having removed the Press and Seal layer.

I coloured the #Elfie images with Stampin' Blends aclochol markers and hand cut them.  The gift is adhered to the card front and the elf is adhered to the raised frame.  I put a Stampin' Dimensional under his head to keep him level.

Finally, I stamped the greeting from the peaceful Boughs stamp set to fill in the remaining white space.

Thank you for visiting.
'Til next time!
Stephanie

Product List - All available for purchase from my online store


Friday, 27 September 2019

Ink it! Stamp it! International Design Team Blog Hop - A Christmas Card inspired by Home Decor

Welcome to the Ink It! Stamp It! Design Team Blog Hop - we hop every month so be sure to pop back and visit us again!  

Today we are sharing projects inspired by Home Decor!

You are currently at my page - Stephanie Fischer, The Crafty Thinker.  At the end of my post there is a full line up of team members, please click on the name after mine in the list to continue the hop.

This is my card ....

#thecraftythinker #stampinup #cardmaking #inkitstampitbloghop #christmascard , Ink It! Stamp It! Blog Hop, Christmas Card, Wood Textures, Frosted Bouquet, Stampin' up Demonstrator, Stephanie Fischer, Sydney NSW
Inspired by Home Decor - A Christmas Card featuring the Feels Like Frost paper

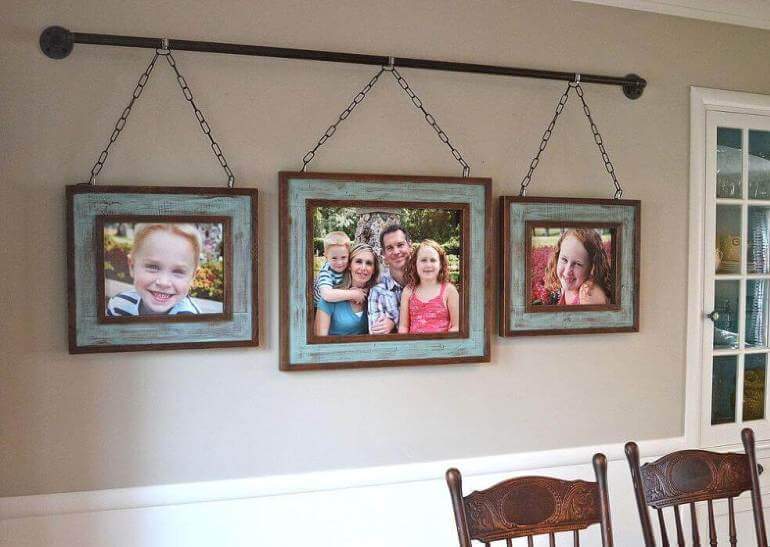
... and this was my inspiration.
Distressed Milk Paint Picture-Hanging Rod
The inspiration for my card.  Visit the site for rustic home decor ideas by clicking on the image
To get the look of the distressed milk painted timber, I roughly sponged some Wood Textures Designer Series Paper with Whisper White Craft Ink and, while it was still wet, then with Bermuda Bay ink.

I "warmed up" the tones in the darker wood textures paper by sponging with some Mango Melody and Cajun Craze ink.

The pretty image in the "frame" is a piece of the Feels Like Frost Specialty Designer Series Paper.

I cut some Beautiful Boughs from Sparkle Glimmer Paper and added some foliage cut from Champagne Foil Sheet using Frosted Bouquet dies.

The greeting is from the #Elfie stamp set, stamped with Blackberry Bliss ink onto Smoky Slate card and cut out with one of the Ornate Frames dies.

Thank you so much for joining us today and we hope you'll join us again next month when we'll be sharing 3D Projects.

I'm Stephanie Fischer and to keep hopping around see the list below to see who is up next with another great project.

Thanks for visiting
'Til next time!
Stephanie

Product List - All available for purchase from my online store

Wednesday, 25 September 2019

Sailing Home Anchor Under The Waves - a masculine card

#thecraftythinker #stampinup #cardmaking #masculinecard #sailinghome , Masculine Card, Sailing Home, Seasonal Layers, Stormy Seas and Anchor, Stampin' Up Demonstrator, Stephanie Fischer, Sydney NSW
A masculine card featuring stormy waves and anchor
created with the Seasonal Layers dies and Sailing Home Bundle
I made this card for my wonderful husband who has been my rock throughout our marriage but especially during my recent illness.

He has helped me navigate through the very turbulent waters of cancer diagnosis and treatment and has been my anchor when I felt I was being swept away and about to drown in my sea of fears, anxiety and emotions.

The design inspiration for the anchor and waves came from a beautiful, sponged and inked card by the very talented Michelle Zindorf.  I've used cardstock and ribbon instead of inks.

I cut the waves from White and Blueberry Bushel cardstock and Vellum with one of the Seasonal Layers dies.  I stamped and cut out the anchor using the Sailing Home Bundle.

TIPS: 

  • I used my Stamparatus to stamp the anchor so that I could keep inking until I was happy with the depth of colour.  
  • It doesn't show in the photograph but I also added a few highlights using the Silvery Shimmer Ink.  Since I haven't yet purchased a refill - I tapped some ink onto a spare acrylic block and added a small spritz of Stampin' Mist cleaner which I used to dilute the ink to a suitable consistency for application with a small paintbrush.

I twisted the Copper Trim so that it was more like rusty anchor chain than ribbon.

I cut out the word "Thanks" with one of the Ornate Frames and added a couple of the Holiday Rhinestones.  The other greeting is from the Beautiful Promenade stamp set and is stamped directly onto the card front.

Thank you for visiting.
'Til next time!
Stephanie

Product List - All available for purchase from my online store

Sunday, 22 September 2019

Mercury Glass Acetate Magnolia Blooms Thank You Card

#thecraftythinker #mercuryglassacetate #stampinup  #cardmaking #magnoliablooms , Mercury Glass Acetate, Magnolia Blooms, Ornate Frames, Stampin' Up Demonstrator, Stephanie Fischer, Sydney NSW
This card features the Mercury Glass Designer Acetate and the Magnolia Blooms stamp set
I've been using the Mercury Glass Designer Acetate on a lot of Christmas cards recently (take a look back through my posts and my addiction will be revealed!) so I decided to use it on a thank you card instead.

I backed the acetate with a piece of Blueberry Bushel cardstock and then placed it onto the Balmy Blue base card.

I stamped the Magnolia Blooms onto Whisper White cardstock by inking the image with Stampin' Write Markers in Lovely Lipstick and Mint Macaron.  I then added some subtle colour with coordinating Stampin' Blends alcohol markers.
TIP: I used the Color Lifter to blend the colour out on the petals.

I hand cut the blooms and added them to the card front.

I used the coordinating label and frame from the Ornate Frames dies to create a secondary feature on the card.  The Frame is Lovely Lipstick and the label is Balmy Blue with the greeting stamped in Blueberry Bushel ink.

Thank you for visiting.
'Til next time!
Stephanie

Product List - All available for purchase in my online store