Sunday, 31 March 2019

Let It Ride in the Woodland

I've still got more lovely embossed metallic cards to share but I thought we'd take a little break and look at another technique with embossing folders.

Inspired by Kelly Acheson's entertaining video, I played with Brusho Crystals and a variety of embossing folders.  With just a few minutes of fevered activity, I ended up with a lovely pile of backgrounds.
#thecraftythinker #stampinup #cardmaking #embossingtechniques #letitride , Let It Ride, Woodland embossing folder, Brusho Colour Crystals, watercolour background, embossing techniques, Stampin' Up Australia Demonstrator, Stephanie Fischer, Sydney NSW
Embossed watercolour backgrounds made with Brusho Crystals, water and some embossing folders
My favourite one used the Woodland embossing folder.  I sprinkled the Brusho onto the side with the Stampin' Up logo and started with a touch of blue (it's very intense, so a little goes a long way) at the open end and then randomly sprinkled Yellow and Moss Green over the rest.

I spritzed very lightly with water to start activating the crystals.

Then I spritzed quite generously with water, angling the direction of the spray so that the blue was encouraged to blend down into the yellow and green.

I placed my piece of Whisper White cardstock carefully onto the wet, inky side and closed the folder before running it through the Big Shot.
#thecraftythinker #stampinup #cardmaking #embossingtechniques #letitride , Let It Ride, Woodland embossing folder, Brusho Colour Crystals, watercolour background, embossing techniques, Stampin' Up Australia Demonstrator, Stephanie Fischer, Sydney NSW
Brusho Crystals, Woodland Embossing Folder and Let It Ride stamp set
This gorgeous horse is crashing out of the woodland at full tilt!
Once the piece was dry, I used a dry brush to lightly run some Frost White Shimmer Paint over the tree trunks and branches.  This produced a wonderful shimmer that's, of course, really hard to capture in the photos!

The base card is 5.75" square and I trimmed the embossed piece to 5.25" square.

I stamped, watercoloured and fussy cut the horse image from the Let It Ride stamp set and cut out the sentiment with the Classic Label Punch.  I then adjusted the size of the label as explained below.
#thecraftythinker #stampinup #cardmaking #embossingtechniques #letitride , Let It Ride, Woodland embossing folder, Brusho Colour Crystals, watercolour background, embossing techniques, Stampin' Up Australia Demonstrator, Stephanie Fischer, Sydney NSW
The Frost White Ink makes the trees shine and shimmer in the light
I also added some dabs of the Frost White Shimmer Paint to the hooves, edged the label with Pacific Point ink and added some Glitter Enamel Dots.
#thecraftythinker #stampinup #cardmaking #embossingtechniques #letitride , Let It Ride, Woodland embossing folder, Brusho Colour Crystals, watercolour background, embossing techniques, Stampin' Up Australia Demonstrator, Stephanie Fischer, Sydney NSW
I was like a contortionist all around my craft room, trying to capture the glimmer of the trees in a photo!
I'm sure you'll be seeing the other backgrounds on future cards.  At the moment they're sitting in "background corner" but sooner or later I'll get around to using them!

HOW TO SHORTEN THE CLASSIC LABEL:
Punch the label as usual. 
#thecraftythinker #stampinup #cardmaking , shortening the Classic Label Punch, Stampin' Up Australia Demonstrator, Stephanie Fischer, Sydney NSW
Feeding the right side of the label into the right side of the Classic Label punch to shorten it
Feed the right side of the label into the punch slot (from the centre) and position as required.  Punch
#thecraftythinker #stampinup #cardmaking , shortening the Classic Label Punch, Stampin' Up Australia Demonstrator, Stephanie Fischer, Sydney NSW
The result after punching the right side of the label shorter
Feed the left side of the label into the punch slot (from the centre) and position as required. Punch
Alternatively, stamp your greeting towards one end and just shorten the other side.
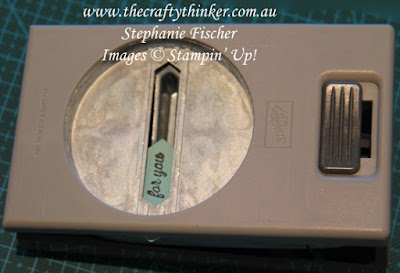
#thecraftythinker #stampinup #cardmaking , shortening the Classic Label Punch, Stampin' Up Australia Demonstrator, Stephanie Fischer, Sydney NSW
Positioning the left side of the label in preparation for punching it shorter
#thecraftythinker #stampinup #cardmaking , shortening the Classic Label Punch, Stampin' Up Australia Demonstrator, Stephanie Fischer, Sydney NSW
The shortened Classic Label

Thank you for visiting.
'Til next time!
Stephanie

Product List - All products used in the project are available for purchase in my online store

Friday, 29 March 2019

Country Floral Gold on Black Duo

These cards form the other half of the Country Floral Black & Gold Quartet that I introduced in Wednesday's post.  
#thecraftythinker #stampinup #cardmaking #embossingtechniques #alteringadiecut #countryfloral #blackandgold , Country Floral embossing folder, Gold heat embossing, Embossing Folder Techniques, Reducing the length of a die cut, Stampin' Up Australia Demonstrator, Stephanie Fischer, Sydney NSW
The Country Floral embossed Gold on Black Duet of cards
They use the same process but with different materials.  This time around I used the Black Foil Sheet and gold heat embossing

#thecraftythinker #stampinup #cardmaking #embossingtechniques #alteringadiecut #countryfloral #blackandgold , Country Floral embossing folder, Gold heat embossing, Embossing Folder Techniques, Reducing the length of a die cut, Stampin' Up Australia Demonstrator, Stephanie Fischer, Sydney NSW
Gold heat embossing on Black Foil Sheet.  You could also use plain Basic Black cardstock 

Tip:  The shine on the black foil comes from a sort of plastic coating which has a tendency to blister under the heat gun.  Keep the heat a bit further away than usual and keep it moving .

You could also use Basic Black cardstock, gold heat emboss in the same way and then (if you're after shine) finish with a layer of clear heat embossing.  I haven't tried it myself but it feels like it should work.
#thecraftythinker #stampinup #cardmaking #embossingtechniques #alteringadiecut #countryfloral #blackandgold , Country Floral embossing folder, Gold heat embossing, Embossing Folder Techniques, Reducing the length of a die cut, Stampin' Up Australia Demonstrator, Stephanie Fischer, Sydney NSW
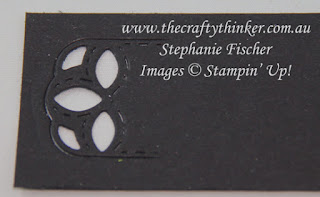
This card has a shortened version of one of the Stitched Label dies

The card above features a very small label made with one of the Stitched Label dies.   This is how I made it.
www.thecraftythinker.com.au, Die Cutting Techniques, Stitched Labels, Reducing the length of a die cut, Stampin' Up Australia Demonstrator, Stephanie Fischer, Sydney NSW
The first step in the process of reducing the length of the die cut

For the first pass through the Big Shot, position the top cutting plate over only the first small part of the die.  This will be the result
www.thecraftythinker.com.au, Die Cutting Techniques, Stitched Labels, Reducing the length of a die cut, Stampin' Up Australia Demonstrator, Stephanie Fischer, Sydney NSW
The result after the first run through the Big Shot

For the second pass through the Big Shot, place the die according to the size you require and ensure it lines up with the first cut.   If you gently wiggle the die, you'll feel when it has settled itself into position.

Place the top cutting plate only over the part of the die you wish to cut - avoiding the part that was cut in the first pass.

www.thecraftythinker.com.au, Die Cutting Techniques, Stitched Labels, Reducing the length of a die cut, Stampin' Up Australia Demonstrator, Stephanie Fischer, Sydney NSW
Positioning the top cutting plate for the second run through the Big Shot

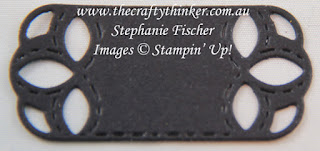
And you'll end up with a shorter version of the die cut.

www.thecraftythinker.com.au, Die Cutting Techniques, Stitched Labels, Reducing the length of a die cut, Stampin' Up Australia Demonstrator, Stephanie Fischer, Sydney NSW
The finished result - a perfect but shorter version of the die cut

So here's the full Quartet of black and gold embossed cards.
#thecraftythinker #stampinup #cardmaking #embossingtechniques #alteringadiecut #countryfloral #blackandgold , Country Floral embossing folder, Gold heat embossing, Embossing Folder Techniques, Reducing the length of a die cut, Stampin' Up Australia Demonstrator, Stephanie Fischer, Sydney NSW
The full Quartet of Black & Gold cards

Thank you for visiting.
'Til next time!
Stephanie

Product List - All products are available for purchase in my online store

Wednesday, 27 March 2019

Country Floral Black & Gold Duo

Ready for some drama?!  There's black and gold coming up ... and lots of it!
#thecraftythinker #stampinup #cardmaking #embossingtechnique #countryfloral , Country Floral Embossing Folder, Heat Embossing, Embossing Techniques, Gold Foil, Stampin' Up Australia Demonstrator, Stephanie Fischer, Sydney NSW
The black & gold duo utilising the Country Floral embossing folder, gold foil sheet and black heat embossing
These two cards are made from one sheet of embossing that I cut in half (yes, it was painful!).  These two cards form part of a collection of cards that I'm putting together for a fundraising silent auction.  It'll be very embarrassing if nobody bids on them!
#thecraftythinker #stampinup #cardmaking #embossingtechnique #countryfloral , Country Floral Embossing Folder, Heat Embossing, Embossing Techniques, Gold Foil, Stampin' Up Australia Demonstrator, Stephanie Fischer, Sydney NSW
A classic black & gold card with a small greeting banner
Country Floral embossing folder with Gold Foil Sheet and black heat embossing
For the little banner on the card above, I used the Banners For You stamp set and coordinating die from the Bunch of Banners Framelits.  The sentiment and banner outline are black heat embossed onto gold foil sheet.

#thecraftythinker #stampinup #cardmaking #embossingtechnique #countryfloral , Country Floral Embossing Folder, Heat Embossing, Embossing Techniques, Gold Foil, Stampin' Up Australia Demonstrator, Stephanie Fischer, Sydney NSW
A black and gold card made with the Country Floral Embossing Folder
The embellishment for the card above comprises a gold foil circle cut with the 1/2" Circle Punch, a black petal cut with one of the Seasonal Layers dies, a Gold Faceted Gem and some ribbon.
#thecraftythinker #stampinup #cardmaking #embossingtechnique #countryfloral , Country Floral Embossing Folder, Hand Made Card Set, Heat Embossing, Embossing Techniques, Gold Foil, Stampin' Up Australia Demonstrator, Stephanie Fischer, Sydney NSW
This is the set so far (A Quartet) - I'll add 2 more cards when I've replenished my stock of gold foil sheet!
TIPS AND TRICKS
  • Give the foil sheet a thorough going over with an embossing buddy before you start.
  • Swipe Versamark onto the inside of the embossing folder, on the side that has "Stampin' Up" printed on it.
  • Being careful not to jiggle the cardstock, run it all through your Big Shot 
  • Carefully remove the embossed sheet and sprinkle with black embossing powder
  • Heat with your heat tool.  You'll probably find that the heating process is much faster on the foil sheet.

SANITY TIPS:
  • Don't expect perfection - even if it's not perfect, it will still look stunning
  • Bearing in mind the tip above, you can use a small, soft, dry brush to remove excess embossing powder before you use your heat tool.
Thank you for visiting.
'Til next time!
Stephanie

Product List - All products available for purchase from my online store