Welcome to the Ink It! Stamp It! Design Team Blog Hop - we hop every month so be sure to pop back and visit us again!
Today our theme is a 3D Project.
You are currently at my page - Stephanie Fischer, The Crafty Thinker. At the end of my post there is a full line up of team members, please click on the name after mine in the list to continue the hop.
 |
| The closed memorabilia "retirement card" album |
Since this post is very image-heavy, I'm not going to say a lot. But I do have a tutorial (with diagrams and pictures) of the basis of this project for anyone who would like it.
 |
| First stage of opening the album. I could have put something on that right side - but the paper is just too pretty! |
We are so blessed in our company - we have wonderful staff who seem to enjoy their work and so they stay ... until they retire! When someone retires, I like to make a "card" that also acts as a piece of memorabilia for them. This is for the most recent retirement.
 |
| Second stage of opening the album |
The base is created with three A4 pieces of Tranquil Tide cardstock, decorated with Share What You Love Designer Series Paper.
 |
| The "flip mechanism" has space for 12 photos |
There's space for lots of photographs, providing memories of people, events and activities through the years.
 |
| The third stage of opening the album reveals some of the pockets holding personal messages |
There's also space for individual cards on which co-workers will write personal messaages.
 |
| The fully opened album |
Underneath all of the flip photos there is a card, written in my poor attempt at calligraphy, with a company message and the start and finish dates for our retiree.
 |
| The album and presentation box |
I didn't have time to correct the situation but I should have made an even deeper gusset to allow for the depth of all the photos. Something I've corrected in my tutorial. I also made a presentation box.
 |
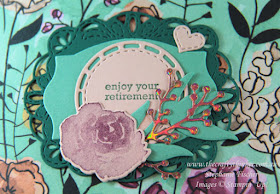
| A close up of the "dedication" on the top of the album |
Click
here if you would like the PDF instructions for the basic build. I must add though that I made some adjustments to create a deeper gusset that I hope will work but I haven't tested them. Please
contact me if you run into problems.
Thank you so much for joining us today and we hope you'll join us again next month when we'll be showing you our favourite colour combo!
I'm Stephanie Fischer and, to keep hopping around, see the list below to see who is up next with another great project.
Thanks for visiting
'Til next time!
Stephanie
Product List - All products used available for purchase in my online store


Oh, that's fantastic! Love the layout! What a great gift, I'm sure that they loved it! :)
ReplyDeleteThank you, Amy. Yes, she loved it - as did everyone else in the office. They pored over the memories for quite a while!
DeleteWonderful, Stephanie! Perfect gift :-)
ReplyDeleteThank you, Jenny.
DeleteOh wow what a lot of work! You are fabulous!
ReplyDeleteThank you, Fiona! It was a bit of work but so enjoyable!
DeleteThis is a wonderful keepsake, Stephanie. I would love to have the instructions for making one.
ReplyDeleteThank you in advance.
Thank you, Debbie. I'm so happy that you like my project. Due to popular demand, I have now learned how to add a link to the PDF file into my blog and have done that. If you have trouble downloading, contact me by email and I'll send you a copy by reply.
DeleteAnd ... I'd love to see your finished project!
This is such an awesome gift...I would love to have the instructions for making one. Thank you for sharing
ReplyDeleteThank you Kathy! I'm so happy that you like my project. Due to popular demand, I have now learned how to add a link to the PDF file into my blog and have done that. If you have trouble downloading, contact me by email and I'll send you a copy by reply.
DeleteAnd ... I'd love to see your finished project!
This is beautiful; such a lovely keepsake for retirement. I would be ever so grateful for instructions please ��.
ReplyDeleteThank you, Lillian! I'm so happy that you like my project. Due to popular demand, I have now learned how to add a link to the PDF file into my blog and have done that. If you have trouble downloading, contact me by email and I'll send you a copy by reply.
DeleteAnd ... I'd love to see your finished project!
I absolutely adore this, Stephanie!! My daughter has a birthday coming up and I've been wanting to make something extra special for her. This might just be it! Thank you for all your hard work to create a PDF! I've already opened it and looked through the directions...I just might be able to do this. I can't even imagine how much your coworker appreciated this!! What a beautiful keepsake and a gift from the heart!
ReplyDeleteThank you, RaeDeen! I think she did appreciate it - as I'm sure will your daughter! Look forward to hearing about / seeing the result! x
DeleteGorgeous album Stephanie, love it x
ReplyDeleteThank you, Angela!
Delete