Pages

Wednesday, 27 February 2019

Hello Cupcake Layers

Who doesn't love a freebie?!!  Until 31 March, this Hello Cupcake stamp set is FREE with a $90 product purchase.
#thecraftythinker  #hellocupcake  #cardmaking  #rubberstamping  #saleabration2019  stampinup , Sale-A-Bration 2019, Hello Cupcake, Stampin' Up Demonstrator, Stephanie Fischer, Sydney NSW
A simple layered card using the Hello Cupcake stamp set (FREE during Sale-A-Bration with a $90 purchase)
The base is Gray Granite with a layer of Calypso Coral, decorated with bits of Twinkle Twinkle Designer Series Paper that I cut with the Stitched Rectangle dies for the detail of the stitched edging.

The oval frames are cut from Cajun Craze cardstock and the embellishments are the Gray Granite Textured Weave Ribbon and the Basic Adhesive-Backed Sequins.

The cupcake was built with four stamps from the set.  They're photopolymer and easy to position.  The bottom layer was stamped with Cajun Craze ink, the next with Crumb Cake, the icing with Calypso Coral and the little heart with Cherry Cobbler.  I then used an Early Espresso marker to darken the area under the cupcake.

Thank you for visiting.
'Til next time!
Stephanie

Product List - All products used in this project are available for purchase from my online store

Monday, 25 February 2019

Springtime Impressions Diamond Anniversary Card

I was thrilled to have the opportunity to make a 60th Wedding Anniversary card for some very dear family friends.  What an achievement!
#thecraftythinker #stampinup #cardmaking #anniversarycard #springtimeimpressions , Springtime Impressions dies, Tufted Embossing Folder, Eclectic Layers, Diamond Wedding Anniversary Card, Stampin' Up Australia Demonstrator, Stephanie Fischer, Sydney NSW
An elegant card to celebrate the Diamond Wedding Anniversary of an Elegant couple
They are such elegant, understated people that I wanted to make a card to match and that led me to think of an all white colour scheme.  Then I remembered the diamond dies in the Eclectic Layers Thinlits set and decided to use some of the Silver Glimmer Paper for sparkle and that led to the addition of the silver elements in the card.

The size of the card was determined by the size of the Tufted Embossing Folder - I cut my layers accordingly and the base card is made from Thick A4 cardstock.

When I tied my white bow, I added a piece of the Silver Sequin Trim through the loop.  I then looped the sequin trim diagonally behind the bow and fixed it with Mini Glue Dots to make a sort of heart shape.

For easy fixing, I added Mulipurpose Adhesive Sheet to the back of the Silver Foil Sheet before cutting the word "Amazing" from the Celebrate You die set.

An entire card without any stamping!

Thank you for visiting.
'Til next time!
Stephanie

Product List - All products used in this project are available for sale in my online store

Sunday, 24 February 2019

Millennium Falcon Punch Art Birthday Card

One of our team members at work is such a keen Star Wars fan that the call tone for his wife is Chewbacca!  So I've made a Millennium Falcon card for his birthday.
#thecraftythinker  #stampinup  #starwarscard #cardmaking  #millenniumfalconpunchart  #starwarspunchart #masculinecard, punch art, Masculine card, Star Wars card, Millennium Falcon Punch Art card, Stampin' Up Australia Demonstrator, Stephanie Fischer, Sydney NSW
Star Wars Millennium Falcon Punch Art birthday card
I've called it punch art but, in truth, I've also used some Layering Circle Framelit dies, I used my trimmer to cut the rectangles and there a couple of small elements of decoration that I cut by hand.  I've used a pencil to give a suggestion of the metal plating.

The greeting is a composite of stamps in the One Wild Ride and Thoughtful Banners stamp sets that I've white heat embossed onto Vellum and then punched out with the Tailored Tag punch.  I thought this was a little reminiscent of the shape of the opening wording in the movies.

The starry background is supplied by a piece of the Twinkle Twinkle Designer Series Paper which is layered onto Whisper White cardstock and then onto the Night of Navy base card.

#thecraftythinker  #stampinup  #starwarscard #cardmaking  #millenniumfalconpunchart  #starwarspuncharttutorial #starwarspunchart #masculinecard, punch art, Masculine card, Star Wars card, Millennium Falcon Punch Art card, Stampin' Up Australia Demonstrator, Stephanie Fischer, Sydney NSW
Click on this image for the PDF Tutorial
for this Millennium Falcon punch art
Thank you for visiting.
'Til next time!
Stephanie

Product List - All products used in this project are available for purchase in my online store

Friday, 22 February 2019

Ink it! Stamp it! International Design Team Blog Hop - 3D Project - Retirement Mini Album

Welcome to the Ink It! Stamp It! Design Team Blog Hop - we hop every month so be sure to pop back and visit us again!  

Today our theme is a 3D Project.

You are currently at my page - Stephanie Fischer, The Crafty Thinker.  At the end of my post there is a full line up of team members, please click on the name after mine in the list to continue the hop.

#thecraftythinker  #stampinup  #cardmaking  #minialbumtutorial  #3dproject , Ink It Stamp It Blog Hop, 3D project, Mini Album, Frosted Bouquet Framelits, Delicate Lace Edgelits, Stampin' Up Australia Demonstrator, Stephanie Fischer, Sydney NSW
The closed memorabilia "retirement card" album
Since this post is very image-heavy, I'm not going to say a lot.  But I do have a tutorial (with diagrams and pictures) of the basis of this project for anyone who would like it.
#thecraftythinker  #stampinup  #cardmaking  #minialbumtutorial  #3dproject , Ink It Stamp It Blog Hop, 3D project, Mini Album, Frosted Bouquet Framelits, Delicate Lace Edgelits, Stampin' Up Australia Demonstrator, Stephanie Fischer, Sydney NSW
First stage of opening the album.  I could have put something on that right side - but the paper is just too pretty!
We are so blessed in our company - we have wonderful staff who seem to enjoy their work and so they stay ... until they retire!  When someone retires, I like to make a "card" that also acts as a piece of memorabilia for them.  This is for the most recent retirement.
#thecraftythinker  #stampinup  #cardmaking  #minialbumtutorial  #3dproject , Ink It Stamp It Blog Hop, 3D project, Mini Album, Frosted Bouquet Framelits, Delicate Lace Edgelits, Stampin' Up Australia Demonstrator, Stephanie Fischer, Sydney NSW
Second stage of opening the album
The base is created with three A4 pieces of Tranquil Tide cardstock, decorated with Share What You Love Designer Series Paper.
#thecraftythinker  #stampinup  #cardmaking  #minialbumtutorial  #3dproject , Ink It Stamp It Blog Hop, 3D project, Mini Album, Frosted Bouquet Framelits, Delicate Lace Edgelits, Stampin' Up Australia Demonstrator, Stephanie Fischer, Sydney NSW
The "flip mechanism" has space for 12 photos
There's space for lots of photographs, providing memories of people, events and activities through the years.
#thecraftythinker  #stampinup  #cardmaking  #minialbumtutorial  #3dproject , Ink It Stamp It Blog Hop, 3D project, Mini Album, Frosted Bouquet Framelits, Delicate Lace Edgelits, Stampin' Up Australia Demonstrator, Stephanie Fischer, Sydney NSW
The third stage of opening the album reveals some of the pockets holding personal messages
There's also space for individual cards on which co-workers will write personal messaages.
#thecraftythinker  #stampinup  #cardmaking  #minialbumtutorial  #3dproject , Ink It Stamp It Blog Hop, 3D project, Mini Album, Frosted Bouquet Framelits, Delicate Lace Edgelits, Stampin' Up Australia Demonstrator, Stephanie Fischer, Sydney NSW
The fully opened album
Underneath all of the flip photos there is a card, written in my poor attempt at calligraphy, with a company message and the start and finish dates for our retiree.
#thecraftythinker  #stampinup  #cardmaking  #minialbumtutorial  #3dproject , Ink It Stamp It Blog Hop, 3D project, Mini Album, Frosted Bouquet Framelits, Delicate Lace Edgelits, Stampin' Up Australia Demonstrator, Stephanie Fischer, Sydney NSW
The album and presentation box
I didn't have time to correct the situation but I should have made an even deeper gusset to allow for the depth of all the photos.  Something I've corrected in my tutorial.  I also made a presentation box.
#thecraftythinker  #stampinup  #cardmaking  #minialbumtutorial  #3dproject , Ink It Stamp It Blog Hop, 3D project, Mini Album, Frosted Bouquet Framelits, Delicate Lace Edgelits, Stampin' Up Australia Demonstrator, Stephanie Fischer, Sydney NSW
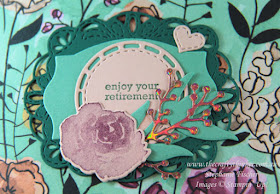
A close up of the "dedication" on the top of the album
Click here if you would like the PDF instructions for the basic build.  I must add though that I made some adjustments to create a deeper gusset that I hope will work but I haven't tested them.  Please contact me if you run into problems.

Thank you so much for joining us today and we hope you'll join us again next month when we'll be showing you our favourite colour combo

I'm Stephanie Fischer and, to keep hopping around, see the list below to see who is up next with another great project.

Thanks for visiting
'Til next time!
Stephanie


Product List - All products used available for purchase in my online store