Wednesday, 31 January 2018

Beautiful Day to Paint a Butterfly with Embossing Paste

Yesterday I showed you a card that I had painted with white embossing paste and gilded with gold embossing powder.  This card uses a very similar technique.
#thecraftythinker, #stampinup, #cardmaking, #wayswithembossingpaste, Beautiful Day, painting with embossing paste, Stampin' Up! Australia Demonstrator, Stephanie Fischer, Sydney NSW
Shimmery White Embossing paste, coloured with a drop of Sweet Sugarplum ink

I started with a little bit of the sparkly Shimmering White Embossing Paste in a small glass container and mixed in just one drop of Sweet Sugarplum ink from a reinker.

Then, using a small brush, I plopped a bit of the paste on the wings, working one segment at a time, and spread it out - keeping an eye on the direction of the brush strokes.  In the darker areas, I didn't add any paste to my brush so it's mainly the glitter from the paste that's sticking to the cardstock and shimmering.
#thecraftythinker, #stampinup, #cardmaking, #wayswithembossingpaste, Beautiful Day, painting with embossing paste, Stampin' Up! Australia Demonstrator, Stephanie Fischer, Sydney NSW
Close up showing the brush strokes in the coloured Shimmery White Embossing Paste

I didn't want to waste the paste that I had left over so I positioned one of the Pattern Party masks and "painted" the paste through it.  I really wish I hadn't because I think I made the card look too busy - but I'll know for next time!

The word "lovely" was cut using one of the Lovely Words Thinlits with Gold Foil Sheet.  I simply trimmed the word from the die cut.

Thank you for visiting.
'Til next time!
Stephanie

Product List - Click on an image to shop in my online store (Australian Residents only)

Monday, 29 January 2018

Beautiful Day to Paint a Rose with Gilded Embossing Paste

This card started out as a failure but I'm really happy with the progress it made!
#thecraftythinker, #stampinup, #cardmaking, #embossingpaste, painting with embossing paste, Beautiful Day, Embossing Paste, Heat Embossing, Stampin' Up! Australia Demonstrator, Stephanie Fischer, Sydney NSW
In this card I experimented with embossing paste and embossing powder

I "painted" inside the gold heat embossing with white Embossing Paste and sprinkled on some Embossing Powder while it was still damp - gold on the petals and silver for the leaf.

There's a Gold Faceted Gem for the centre of the flower and a scattering of silver sequins from the Metallics Assortment.

On top of the base card, there's a fairly wide border of Silver Foil Sheet.
#thecraftythinker, #stampinup, #cardmaking, #embossingpaste, painting with embossing paste, Beautiful Day, Embossing Paste, Heat Embossing, Stampin' Up! Australia Demonstrator, Stephanie Fischer, Sydney NSW
Close up showing the painted on Embossing Paste with Gold Embossed edging
Embossing paste is a little tricky to manoeuvre, especially in small spaces, so I applied the paste with a small brush.  I sort of plonked it in the petal with a bit of a twist motion and then used the brush to spread it out, adding a little more if needed.  I tried to pull the paste from the outside of the petal inwards and leave a few brush marks to give some depth and definition.

TIPS & TRICKS

  • I started with a gold heat embossed flower.
  • My first challenge was that my embossing paste had gone quite dry (there wasn't much left in the pot!).  However, I scraped some out with a palette knife and mixed in a few drops of water in a small glass dish and it became quite workable.
  • I thought my brush would be a write off afterwards BUT I rinsed it off after each petal and gave it a good wash at the end and I'm happy to report that it has suffered no damage!
  • Despite all my care, it was inevitable that I would get some embossing paste onto the gold lines of the flower.  While the paste was still damp, I simply used a small damp brush to clean along the lines.
  • I worked one petal at a time, applying the paste , sprinkling on the embossing powder, tapping off the excess and using my brush to draw the powder down the petal a little.  I only used the heat tool at the end.
  • To apply embossing powder into small areas I keep plastic straws in my craft room.  I've cut fairly short lengths at a bit of angle (a bit like a nib).

I hope you like this technique and card.  I also made a shimmery butterfly which I'll share with you shortly.

I will welcome any comments you may have, in the meantime ...

Thank you for visiting.
'Til next time!
Stephanie

Product List - Click on an image to shop in my online store (Australian Residents only)


Sunday, 28 January 2018

Crazy Crafters Blog Hop with Special Guest Rose Coleman

Image may contain: text 
IMG_1647
Click this image to visit Rose's blog
Welcome to the Crazy Crafters' Blog Hop with our Special Guest stamper, Rose Coleman - we are thrilled to have Rose join us this month and so excited to CASE (Copy And Selectively Edit) any project that has been created by her. 
 
Whether you are starting the blog hop here at my blog, Stephanie Fischer - The Crafty Thinker, or have come from the person before me, be sure to click on the person listed under me further down the page to continue your journey on this blog hop.

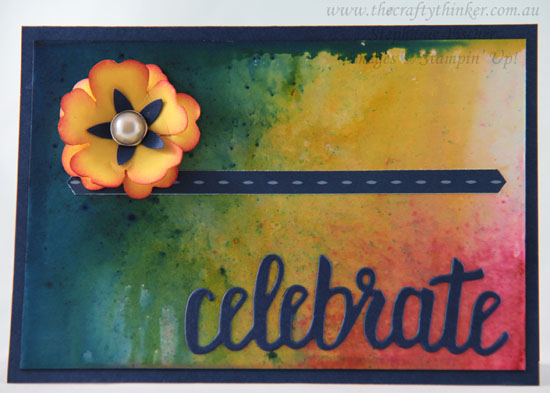
I liked so many of Rose's cards that it took me some time to work through a short list and then select the card to the left to CASE.   I chose it because I liked the simplicity of the design and thought I'd be able to use one of my Brusho backgrounds.

#thecraftythiner, #cardmaking, #brusho, Brusho background, Saleabration, Celebrate You dies, Stampin' Up! Australia Demonstrator, Sydney NSW
Brusho background.  The Celebrate You thinlit dies are FREE with a qualifying order during Sale-A-Bration


The bold colours and contrasts make for quite a dramatic effect!

For this particular Brusho background, I spritzed Glossy White cardstock with LOTS of water until there was a layer of water all over the card.  I then sprinkled on some blue, red and yellow Brusho crystals and watched the magic of the blending!

I cut the word with one of the Celebrate You Thinlit dies that are FREE during Sale-A-Bration with a product order of $180.  For more information on all the great deals and offers available until 31st March, visit my Specials & Promotions page.

Thanks for following our blog hop. Remember that currently you are at my blog - Stephanie Fischer - so click on the next name in the list to ensure that you don't miss out of seeing any of the blogs and the amazing inspiration they contain.

Thanks for visiting
'Til next time
Stephanie


Product List - click an image to visit my online store (Australian Residents only)


Friday, 26 January 2018

Bouquet Bunch to Celebrate You

This card is entered into the Crazy Crafters Team Highlights this week.  Click here to see the full line up of projects and vote for your favourites!

Happy Australia Day!!!

I liked this card so much that I decided to CASE it myself!  This time I've used soft colours instead of the metallics.
#thecraftythinker, #saleabration, #floralcard, #stampinup, #cardmaking, Celebrate You dies, Petals & More, Bouquet Bunch, Stampin' Up! Australia Demonstrator, Stephanie Fischer, Sydney NSW
I love all the foliage and pretty, soft flowers in this card.  The pearls add a soft luxury.
Before I started die-cutting, I put some Multipurpose Adhesive Sheet on the back of the cardstock so that adhering the pieces to the card was a breeze!

I used a Dark Rich Razzleberry Stampin' Blend marker and the Color Lifter to darken the centres of the larger flowers and popped a Pearl Basic Jewel into centre of each flower.

I also made a pared down version by reducing the number of die cuts that I used and I like this one too!
#thecraftythinker, #saleabration, #floralcard, #stampinup, #cardmaking, Celebrate You dies, Petals & More, Bouquet Bunch, Stampin' Up! Australia Demonstrator, Stephanie Fischer, Sydney NSW
I also love the simplicity of the pared down version of the card!
I darkened the centres of the flowers in the same way as before but added some of the pearlescent sequins from the Metallics Assortment instead of the pearls.  I think it gives a more modern look to the card.

The "amazing" is from the Celebrate You Thinlits dies which are FREE from the Sale-A-Bration catalogue with a product purchase of $180.  See my Specials & Promotions page for more details of the amazing Sale-A-Bration offers and opportunities until 31st March.

COMPETITION TIME!
I can't choose between them - which one do you like best? Leave a comment or contact me with your choice.  I will put the names of everyone who voted for the winning card into a hat and draw out one name - and I'll send the card to that person.

Thank you for visiting.
'Til next time!
Stephanie

Product List - Click on an image below to shop in my online store (Australian Residents only)