 |
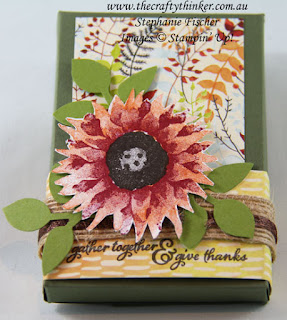
| The first batch of Painted Harvest Thanksgiving table favours is complete! |
It's Spring time here in Australia but one of the traditions that my American husband likes to continue is Thanksgiving! Other than the obvious seasonal conflict there's a slight challenge with timing since we don't have a public holiday for it here. So one Sunday a year (just one in November that suits) we come together to celebrate our family, friends and everything else for which we're grateful. I think of it as an annual Gratitude Lunch and always try to make something suitable as a little gift to take away.
 |
| One of these will complete each place setting at our Thanksgiving table |
I don't yet know how many people will be attending this year but it's normally around 24 - so I've made a start!
Inside the pretty wrapper is a chocolate bar and an area to write some goals, affirmations or just reminders of things we're grateful for. The idea is that this list can be cut off and stuck to a fridge or mirror (I'll include a piece of blu-tack).
 |
| Chocolate for instant gratification and space to write affirmations for the long term |
- Trim a piece of A4 to 11" long (yes- I seem to combine Imperial and Metric measurements!)
- Score along the long side at 3", 3.5", 7.5" and 8"
- Turn 90 degrees and score the short side at 2.5", 3", 5.75" and 6.25"
- On the long sides, cut along the 3.5" and 7.5" score lines until you meet the second horizontal score line.
- On the short sides, cut along the 3" and 5.75" score lines until you meet the first horizontal score line.
- I chose to diagonally trim the corners of the "end flaps" but this is optional.
 |
| Diagram for cutting and scoring the wrapper/box |
 |
| I used Peekaboo Peach (stamped twice), Cherry Cobbler and Early Espresso inks for the flowers |
 |
| The back of the belly band looks tidy because the ribbon is joined at the front under the flower |
 |
| The production line of Painted Harvest Thanksgiving table favours |
'Til next time!
Stephanie
Addendum: 9 November 2022
My attention has been drawn (thank you Wendy) to the fact that the dimensions that I supplied are a bit confusing - please accept my apologies and see below for clearer dimensions in both Imperial/inches (written in red) and Metric/cm (written in blue).
Start with a piece of card that measures 11" x 8 1/4" (28cm x 21cm)
- Score along the long side at 3", 3 1/2", 7 1/2" and 8"
(7.7 cm,9 cm,19 cm,20.4 cm) - Turn 90 degrees and score the short side at 2 1/2", 3", 5 3/4" and 6 1/4"
(5.2 cm,6.4 cm,23.4 cm,24.7 cm) - On the long sides, cut along the 3 1/2" (9 cm) and 7 1/2" (19 cm) score lines until you meet the second horizontal score line.
- On the short sides, cut along the 3" (6.4 cm) and 5 3/4" (23.4 cm) score lines until you meet the first horizontal score line.


Just beautiful! What a great idea for a thanksgiving favor!
ReplyDeleteThank you for your very kind comment!
DeleteI was wondering if you had a video tutorial for these beautiful boxes. I wanna make 6 Halloween 6 Thanksgiving and 6 Christmas ones.
ReplyDeleteThank you for your question, Jennifer. The short answer is - no, I don't!
DeleteTruth is that I'm not very confident with videos - mainly the tech side of it! I promise I'll give it a go over the weekend ... but I can't promise I'll be able to get it "on air" so to speak!
Jennifer - I'm so sorry! I recorded a video but technology is currently defeating me and I've been unable to download it so far. I haven't given up yet though.
DeletePlease can you give it a go again ;-) I would love to make these up for my sons trip for school. They are doing team building and I think it would be great for each child to say what they are thankful for from each class member ;-)
DeleteHi - thanks for your interest! Well, I have tried. I've even had lessons - but I just don't seem to be able to get the hand of it. Life is a bit hectic right now but, hopefully, I'll get an opportunity to take another run at it over the weekend.
Delete