These cards came about because I had one of the sleigh elements left over from making these earring gift cards.
The Whisper White Classic Weave Ribbon needed something more, so I added some gold Washi Tape
The Foil Frenzy matches the opulence of the metallic sleigh without going too over the top!
A Soft Sky base card and Classic Weave Ribbon finish off this simple card
Adhering some Multipurpose Adhesive Sheet to the back of the foil sheets before die cutting with that detailed sleigh thinlit makes it sooo easy to stick to the under layer of the sleigh! Thank you for visiting. 'Til next time! Stephanie Product List - Click on a product image below to visit my online store (Australian Residents only)
One of my friends recently made a sea change so this will be her first Christmas by the beach - this card may be for her!
Christmas Staircase meets Beachy Little Christmas - a stamp set so suitable for Xmas in Australia!
Having cut the staircase from Wood Textures Designer Series Paper with the die from the Christmas Staircase Thinlits, I used a Crumb Cake Stampin' Write Marker to emphasise the lovely embossed details and add a little shading. I stamped the tree image from Beachy Little Christmas in Sahara Sand ink and then, using a Garden Green Stampin' Write Marker, inked the branches. I don't think I could have done this manually - I made use (finally!) of my precision stamping folder (like a Misti). I then used Stampin' Write Markers to add colour and definition to the rest of the image. Having masked the bucket, I then sponged on some Crumb Cake ink to provide a suggestion of flooring and stamped the sentiment in Chocolate Chip ink. Lastly, I added a layer of Wood Textures paper to the Real Red base card before adhering my card topper. Thank you for visiting. 'Til next time! Stephanie Product List - Click on a product image below to visit my online store (Australian Residents only)
Yesterday, when I CASEd a card by the talented Sarah Fleming for the Crazy Crafters Blog Hop, I turned the card into a gate fold with a pair of earrings inside as a surprise. I promised I would share a tutorial today .... so here it is!
This is a CASE of the card I shared yesterday. The dimensions are slightly different, as yesterday's card was square. I've also included below some pictures of another earring holder card that I made with red and gold with different dimensions again.
The base card is a gate fold made with Basic Black cardstock cut to 9" x 5.5" and folded at 2.75" and 6.25". This time I cut a piece of the gorgeous Merry Music Specialty Designer Series Paper for the front and used Silver Foil Sheet for the top layer of the sleigh and for the oval layer. The sponging on the Merry Christmas banner is done with Smoky Slate ink and I used a piece of Black Shimmer Ribbon for the closure. The final touch was some randomly positioned Rhinestone Jewels.
Black, white and silver is always so elegant - even at Christmas!
TIP: Placing Multipurpose Adhesive Sheet on the back of the Silver Foil Sheet before die cutting makes simple work of adhering the detailed die cut!
The inside of the card is decorated with some more of the Merry Music paper. The large greeting is from the Merry Little Labels stamp set and the silver heat embossed sentiment is from the Hang Your Stocking stamp set.
The earrings are made with Year of Cheer Embellishments
To make the earring tag, I cut a piece of Basic Black cardstock to about 3" wide and used one of the Lots of Labels framelits to cut just one end by placing the top cutting plate only over one end of the die.
Die cutting one end of a tag with a label framelit
I then heat embossed the greeting and scored across the tag in the place that would best suit the length of the earrings. Once I'd folded on the score line, I used a piercing tool to make two small holes on the score line from which to hang the earrings. I then trimmed off any excess from the top of the tag, leaving myself about a 1/2" flap.
Tag with one end only cut with a Lots of Labels die
The next step is to make the slot for the earring holder tag. Having stamped the greeting at the top of the card piece (cut to 5 3/8" x 4 3/8"), I drew a light pencil line to show me where I wanted to cut the slot using the tag as a guide. I then used my Stampin' Trimmer to cut the slot, making it a teeny bit larger than the tag to make it easier to feed the tag through the slot from the front.
Making a slot for the Earring Holder Tag
Place glue (I used strips here to make it easier to photograph the positioning of the adhesive) on the under side of the tag at the back.
Adhesive positioning for the tag
Check that the tag is positioned correctly at the front (straight and with the little holes accessible) and then press down to adhere.
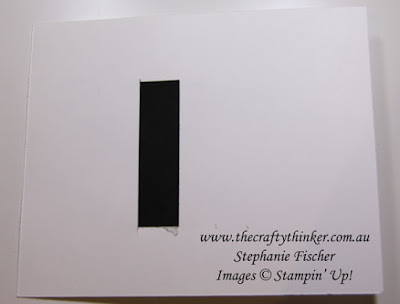
The back of the earring tag glued into position
The finished size of this red and gold version is 5" x 4".
Gate Fold Earring Holder card decorated with Be Merry Designer Series Paper
I used Whisper White Classic Weave ribbon for the closure.
Welcome to the Crazy Crafters' Blog Hop with our Special Guest stamper, Sarah Fleming - we are thrilled to have Sarah join us this month and so excited to CASE (Copy And Selectively Edit) any project that has been created by her .
Click to visit Sarah's blog post
Whether you are starting the blog hop here at my blog, Stephanie Fischer - The Crafty Thinker, or have come from the person before me, be sure to click on the person listed under me further down the page to continue your journey on this blog hop.
The simple colour scheme and layout of this card really appealed to me and so this is the card I've chosen to CASE (Copy And Selectively Edit). Although, in my hands, the pleasing simplicity has all but disappeared - this card has a little secret!
I used silver heat embossing instead of clear and randomly placed small stars from the Star of Light stamp set over the front of this Gate Fold card.
The front of this project looks like a normal gate fold card ... but there's a little surprise inside!
I wrapped Solid Bakers Twine around the centre panel of Silver Foil Sheet and Basic Black cardstock. (I only had white twine, so I died it black with Basic Black reinker mixed with a little water.) I then added another Basic Black panel to the back to keep the inside of the card looking clean and tidy. This panel is adhered to only the left side of the card.
To this panel I added the black oval and Silver Foil element cut with the Starlight dies. I made some more little decorations with the Starlight dies and glued them to the card front. One of them is glued only at the bottom so that it can hold the card closed.
Now for the secret! The card is hiding a gift. The inside of the card is designed to hold and display a pair of earrings - in this case a pair that I made using the Year of Cheer Embellishments.
Inside the gate fold card is a gift presentation for a pair of earrings
The side panels are decorated with Year of Cheer Specialty Designer Series Paper and the greetings are from the Merry Little Labels and Snowflake Sentiments stamp sets.
The earrings in this gate fold card are made with Year of Cheer Embellishments
The greeting on the earring holder is silver heat embossed and I've added some more of the little star decorations that I used on the front of the card.
There's plenty of space underneath the earring flap to write a personal message
Tomorrow I'll be sharing a variation on this theme that will include a tutorial.
I hope you've enjoyed this card and I welcome your comments. Thanks for following our blog hop. Remember that currently you are at my blog - Stephanie Fischer - so click on the next name in the list to ensure that you don't miss out of seeing any of the blogs and the amazing inspiration they contain. Thanks for visiting 'Til next time Stephanie