Monday, 31 October 2016

Gingerbread House Treat Box

For quite some time now, this particular bundle of stamps and dies has been looking at me reproachfully, unused, in the corner of my craft room - only because there's so much that I like in the Holiday catalogue and hadn't got to this one yet!  

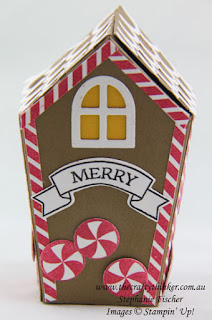
Still on my search for the perfect addition to my Christmas table, I thought I'd try gingerbread house treat boxes. 
Stampin Up, #thecraftythinker, Christmas Treat Box, Gingerbread House,Xmas Table Favour, Sweet Home Bundle, Stampin Up Australia Demonstrator, Stephanie Fischer, NSW
I put some Crushed Curry cardstock behind the windows to give a cosy look

The box is made from Soft Suede cardstock, which seems to be the right colour for gingerbread.
Stampin Up, #thecraftythinker, Christmas Treat Box, Gingerbread House,Xmas Table Favour, Sweet Home Bundle, Stampin Up Australia Demonstrator, Stephanie Fischer, NSW
The back of the house

I decorated the sides and back of the box with "candy canes" and "pepermint sweets" (or lollies as we call them in Australia!).
Stampin Up, #thecraftythinker, Christmas Treat Box, Gingerbread House,Xmas Table Favour, Sweet Home Bundle, Stampin Up Australia Demonstrator, Stephanie Fischer, NSW
Side view
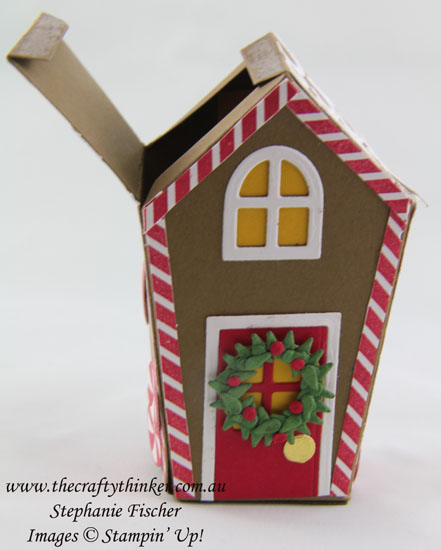
To make the wreath for the front door, I cut the wreath shape from the Home Sweet Home Thinlits and decorated it with little green leaves  and red berries that I cut with the dies from the Umbrella Weather die set.
Stampin Up, #thecraftythinker, Christmas Treat Box, Gingerbread House,Xmas Table Favour, Sweet Home Bundle, Stampin Up Australia Demonstrator, Stephanie Fischer, NSW
Dies to make leaves and berries
Stampin Up, #thecraftythinker, Christmas Treat Box, Gingerbread House,Xmas Table Favour, Sweet Home Bundle, Stampin Up Australia Demonstrator, Stephanie Fischer, NSW
A close up of the little wreath

I put a layer of a 2-way glue on the flaps of the lid and let it dry so that it formed a temporary adhesive.  This way the box can be opened and closed again.
Stampin Up, #thecraftythinker, Christmas Treat Box, Gingerbread House,Xmas Table Favour, Sweet Home Bundle, Stampin Up Australia Demonstrator, Stephanie Fischer, NSW
Thanks to 2-way glue, the lid can open and close again.
Will the gingerbread house make it to the Christmas table?  That will depend on whether I can summon up sufficient patience to make 15 of those little wreaths!

Thank you for visiting.
'Til next time!
Stephanie

Product List - To visit my online store, click one of the product images below (Australian Residents only)

Sunday, 30 October 2016

You've Got This Sympathy Card


Sometimes inspiration comes from some fabric, a photo, painting, advertisement or shop display and occasionally it's a mystery.  There's no mystery with this card, though.  This beautiful card by Kylie Bertucci really inspired me, although I can only aspire to her complete mastery of the Clean And Simple style (CAS) that eludes me.
Stampin Up, #thecraftythinker, Sympathy Card, You've Got This, Butterfly Basics, Stephanie Fischer, Stampin Up Australia Demonstrator, Sydney, NSW
A combination of stamps from the You've Got This, Butterfly Basics and Wild About Flowers sets
Stampin Up, #thecraftythinker, Sympathy Card, You've Got This, Butterfly Basics, Stephanie Fischer, Stampin Up Australia Demonstrator, Sydney, NSW
The sentiment is from the Flourishing Phrases set
I used Crumb Cake ink for the watercolouring and added a tiny touch of Daffodil Delight to the centres of the flowers.

Thank you for visiting.
'Til next time!
Stephanie

Product List - To visit my online store, click on a product image below (Australian Residents only)

Friday, 28 October 2016

Paisley Square

This card is entered into the Crazy Crafters Project Highlights for this week.  So see all the other great projects and to vote for your favourites, click here (from 7.30pm).

I made some pretty paisley background paper for this card and the leftover piece had been sitting on my desk ever since then.  So, today, I decided to use it up!
Stampin Up, #thecraftythinker, Paisleys & Posies, Card making, Craft, Stampin Up Australia Demonstrator, Stephanie Fischer, Castle Hill NSW
The Paisleys & Posies Bundle is so much fun to use!
The decorative panel is made from layers of Basic Black, Pink Pirouette and Basic Gray cardstock.  I stamped the banner and sentiment from Thoughtful Banners in Basic Black ink onto Pink Pirouette cardstock and cut it out with the matching framelit.  I coloured the ends of the banner with a Smoky Slate Stampin' Write Marker before sticking it to the panel.

I cut layers of paisley with the Paisley Framelits, mixing and matching colours in Smoky Slate, Basic Black, Basic Gray and Pink Pirouette.  I partially inked one of the Pasinleys & Posies stamps with a Basic Black Stampin' Write Marker to stamp the little flower and added dabs of white with a Stampin' Chalk Marker.

The decorative panel is popped up on dimensionals.
Stampin Up, #thecraftythinker, Paisleys & Posies, Card making, Craft, Stampin Up Australia Demonstrator, Stephanie Fischer, Castle Hill NSW
Such a simple way to dress up the inside of a card
I used leftover pieces of my patterned paper to decorate the inside of the card.

Thank you for visiting.
'Til next time!
Stephanie

Product List - To visit my online store, click on one of the product images below (Australian Residents only)

Wednesday, 26 October 2016

Christmas angel tutorial

With lots of places to set for Christmas dinner, it's time for me to start thinking about table decorations.  I'm not entirely sure whether this little angel will make the grade but it's certainly quick and simple!
I should have either cleaned up the excess glue or scrubbed my cutting plate to prevent the grubby look!

I did think about giving her arms, but after a few trial runs I decided they were distracting and didn't really add a lot (from my perspective - I'm sure the angel would love some arms!)
These are the tools I used.

I cut some Shimmery White cardstock with the Detailed Floral Thinlit , glued it to a piece of Whisper White cardstock and then cut a circle with the largest of the Layering Circle Framelits.
The decorative circle.

I marked the centre on the back of the circle
I use the markings on my cutting mat

Then I cut out a wedge.
Only cut to the centre of the circle.

I folded the circle around to form a cone and glued it together.  I then squashed it a little to flatten the cone slightly.
The squashed cone!


I cut a piece of Shimmery White cardstock with the Bold Butterfly Framelit and embossed it with the Seaside embossing folder.
I marked the pieces to remove
  
I then cut off the head and tail parts of the butterfly as shown.
Once the head and tail have been removed, you're left with angel (or fairy) wings.

I then glued the wings to the back of the cone.
The angel looks decapitated, but I was trying to show the construction process!

For the head, I punched a 3/4" circle from Whisper White and also from Gold Foil, offset them a little to form a halo and glued them together.  I drew a very simple face with a black Stampin' Write market and added hair with some more markers (I used So Saffron  and Soft Suede) before adding the head to the body with a glue dot.
I tried different hair colours.

Thank you for visiting.
'Til next time!
Stephanie

Product List - To visit my online store, click on a product image below (Australian Residents only)