 |
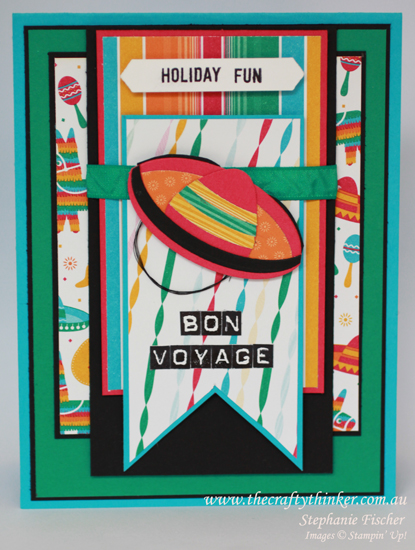
| A very layered card with a "die-art" sombrero |
The design of the card is very loosely based on a sketch I saw on Pinterest by Pam Callaghan for Chickaniddy Crafts.
 |
| Pieces required for the sombrero |
 |
| Positioning the oval die to trim off an edge |
I then glued the piece of blossom builder (Melon Mambo) to the front edge of the elipse for form the crown of the hat. Using the same method as before, I trimmed the long edge off one side of a Melon Mambo Oval and both from a Basic Black oval. I kept only the edges of the black one.
 |
| Elipse for the sombrero |
To create the back turned up hat brim, I used the untrimmed edge of the Melon Mambo oval and lined up and adhered the main piece of hat, with the crown, a little lower to create the pink edge. I then adhered a black edge behind the pink and trimmed where necessary.
I then used the remaining Melon Mambo and Basic Black strips to create the front edge of the hat and adhered them in position - just covering the "petal" edge of the hat crown.
To make the hat trim, I used the same oval framelit to cut strips of DSP. I decided to position them at the end though, so that I could make sure they lined up with the hat brim once I'd made it.
I needed to fill a bit more space, so I created a loop with Black Metallic Thread and stuck it to the back of the sombrero.
 |
| The sombrero |
The Bon Voyage greeting was created with the Labeler Alphabet. I stamped the letters, cut them out and stuck them to another piece of card. I used the corner and edge of that piece of card to ensure that the letters were straight. I then cut around each word and adhered it to the front of the card. Since the letters are photopolymer, it's easy enough to line them and stamp a word at a time but I didn't want the white space between the letters.
 |
| Layers & dimension! |
I used Tempting Turquoise, Basic Black, Melon Mambo and Emerald Envy cardstock to create layers with a variety of the DSP patterns - there are a lot of layers and more than a few Dimensionals! As I put it together I was thinking about Bruno Bertucci and Brian King who LOVE layers and dimensionals!
I hand cut the tails in the banner - only because they were too big for the Banner Triple Punch and I don't yet own the Banners Framelits (note the use of the word "yet"!"
Thanks for visiting
'Til next time
Stephanie
In order that I may provide you with VIP service - when setting up your account, please click "Yes" that you allow your Demonstrator to contact you.
Product List - To shop in my online store - click on one of the product images below (Australian Residents only)


My hats off to you and your friend, Margaret, for learning Spanish. I took it in college but never mastered it by any means. This card will definitely bring a smile to Margaret's face as she goes on her vacation to Mexico. I love your creativity in "designing" the sombrero. It is so cute and makes the card so much fun. She'll love it.
ReplyDeleteThank you so much for your lovely comment! And your pun made me smile!
DeleteThis is really fun and cute. The color combination is gorgeous. It looks even better in person.
ReplyDeleteThanks, Satomi! I think I need to hone my photography skills!
Delete