Pages

Thursday, 28 April 2016

New In Colours 2016-2018 - Sneak Peek

The new In Colours are:

  • Dapper Denim
  • Emerald Envy
  • Flirty Flamingo
  • Peakaboo Peach
  • Sweet Sugarplum
As a little exercise for myself, whenever new colours are added to the range, I make up little colour boards to help me understand their place in the collection and how the hues and tones will work with each other.

These are my most recent colour boards.

Stampin Up, #thecraftythinker, Sneak Peek, In Colours 2016-2018, Colour Board
Yellow / Orange / Purple boards incorporating the new In Colours: Peakaboo Peach and Sweet Sugarplum

Stampin Up, #thecraftythinker, Sneak Peek, In Colours 2016-2018, Colour Board
Pink / Red colour board incorporating the new In Colour, Flirty Flamngo.
SU, Stampin Up, Colour Board, 2016-2017 In Colours, Dapper Denim, Emerald Envy
Blue and Green colour boards incorporating the new In Colours: Dapper Denim and Emerald Envy
'Til next time
Stephanie

Wednesday, 27 April 2016

Negative space with Botanical BuilderS

I guess you know you've reached a certain age when you start needing more sympathy cards than any other kind of card.  Yet another of my dear friends has suffered the loss of a parent.

SU, using negative spaces, botanical builder, bloomin' Heart, Easel Card, Fun Fold, Sympathy card
Some tropical flowers and leaves for my friend

My friend lives in Queensland and loves tropical plants, so I'm hoping this card will bring her a little much-needed comfort.

SU, using negative spaces, botanical builder, bloomin' Heart, Easel Card, Fun Fold, Sympathy card
Negative spaces can be very powerful - it just takes a little planning.


I have since realised, though, that in place of the little butterfly, I should have put a little green tree frog - her mother really loved those!

SU, using negative spaces, botanical builder, bloomin' Heart, Easel Card, Fun Fold, Sympathy card
Easel cards are so satisfying to make and so nice to receive!


This is a 6" x 4.5" easel card made with Basic Gray cardstock and layered with Basic Black and Smoky Slate cardstock.  

The leaves and flowers that appear black are negative spaces cut with the Botanical Builders dies from the Smoky Slate cardstock so that the underlying black cardstock shows through.

The pink flowers are cut with the Botanical Builders die and one of the flowers in the Bloomin' Heart Thinlits set from Blushing Bride cardstock.

The sentiment is from the Birthday blooms stamp set.

The butterfly is stamped in Rose Red ink on Whisper White with one of the Papillon Potpourri stamps and punched out with the matching  Bitty Butterfly punch.

Thank you for visiting
'Til next time
Stephanie

Monday, 25 April 2016

Star Wars Stormtrooper

I wanted to make a special birthday card for one of my Great-Nephews and at the moment he really loves Star Wars Stormtroopers!  So I decided to have a go at creating one with punch art!
SU, Punch Art, Star Wars, Stormtrooper, Star Wars stormtrooper, Boy birthday card, handmade card
Not exactly perfect but not too bad for a first attempt.  The nose piece is Basic Gray cardstock with black
hand-drawn lines


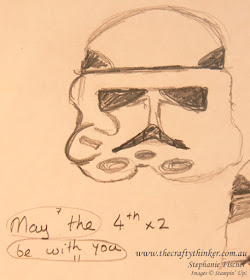
The first thing I did was to Google images and then I made a little sketch and started looking for shapes that I could punch.
The Crafty Thinker, sketch for star wars stormtrooper card, #thecraftythinker
My sketch plan and calculations!


I decided what size I would like the finished piece to be and worked backwards from there to determine sizes for the elements.  The first size I chose was the diameter of the circle for the top of the helmet.  That gave me the dimensions for the square that I cut and round cornered and to which I glued all the pieces.

SU, Punch Art, Star Wars, Stormtrooper, Star Wars stormtrooper, Boy birthday card, handmade card
The back of the piece gives a good idea of how I constructed it

I've included a photograph of the back of the piece that shows the punches I used and how I attached them.  Also included in that photo are the shapes I used for the grey and black pieces.


The only pieces that I didn't photograph are the thin strip of black cardstock between the top of the helmet and faceplate and the nose piece, which I ended up hand cutting! 

I used my snips to round off sharp corners when I cut the eyes from the oval punched shapes.

I used a 1/2" circle punch for the black circles on either side of the mouth piece.

The Crafty Thinker, sketch for star wars stormtrooper card, #thecraftythinker
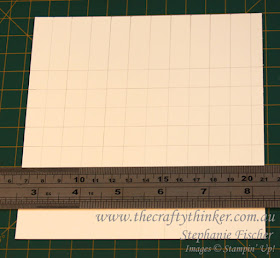
Drawing up the grid

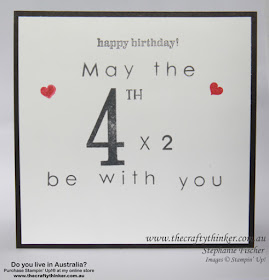
For the inside of the card, I thought of that old chestnut "May the 4th be with you" and made a play on that.  When positioning the letters, I lightly drew a grid with a pencil to help determine what I'd be able to fit on a line as well as to help line it all up and centre it.  The photopolymer stamps really helped with this process!

The Happy Birthday greeting is from the stamp set Boys Will Be Boys, the number "4th" is from Number of Years and all the remaining letters and numbers are from the Back to Basics Alphabet. The hearts were from Another Thank You and I stamped them in Real Red.


SU, Punch Art, Star Wars, Stormtrooper, Star Wars stormtrooper, Boy birthday card, handmade card
Can you guess his age?

The black card base is 5 1/2" square (5 1/2" x 11" scored at 5 1/2").  The white layer is 1/4" smaller at 5 1/4" and the Basic Gray layer is 5 1/8".

It was a bit of a learning experience and, if I did it again, I would know to pay closer attention to symmetry and would reduce the length of the "face" a bit.

The oval punches are retiring on 31st May but I think the new Layering Ovals Framelits will provide suitable shapes.

Thank you for visiting.

'Til next time
Stephanie

Product List - click on an image to shop in my online store

Sunday, 24 April 2016

Sneak Peek - Love & Affection Horizontal Easel Card

Today I have another sneak peek for you.  I've used one of the flower images from Love and Affection and a new set of borders called ... Mixed Borders!

SU, Sneak Peek, new catalogue, Love & Affection, Mixed Borders, Horizontal Easel Card, fun fold
New products: Love & Affection and Mixed Borders

I watercoloured the flower with Smoky Slate and Calypso Coral and punched it out with a circle punch.  I added a Rhinestone Jewel to the centre.

The borders are very cleverly designed with a gap in the strip so that there is a ready made space for a sentiment or embellishment.  My circle was a little larger than the ready-made gap, however, since they are photopolymer stamps, it was really easy to manually line up the borders where I wanted them.  In fact, I'd already adhered the stamped circle before I decided to add the line of dots and it couldn't have been easier to do!  I stamped my borders in Basic Black onto Calypso Coral cardstock.  I added little rhinestone jewels to the centres of the four mini flowers and silver glitter (see below) to the tiny little flowers.

The horizontal easel card is made from Basic Gray and the layers are Smoky Slate, Whisper White and Calypso Coral.

SU, Sneak Peek, new catalogue, Love & Affection, Mixed Borders, Horizontal Easel Card, fun fold
The open horizontal easel card

The support for the easel is Smoky Slate and I kept it simple - just adding a sentiment from Rose Wonder and an image from Love and Affection which I punch out with a circle punch.

To make things a little easier for myself - I stamped the entire floral image in Calypso Coral and then went over the leaves with the fine end of a Basic Gray marker.  I then used the dotted half circle image from Mixed Borders to add a border.  I simply "bent" it to the shape I wanted and stamped several times around the edge - fortuntely, it fit perfectly!

I cut out the sentiment with one of the label dies from the Project Life Cards and Labels framelits.  I punch a circle from Calypso Coral to layer the stamped circle.   

I wanted to add some sparkle to the centres of the little flowers but discovered that I didn't have any silver Dazzling Details - a terrible oversight!  So I used the Dazzling Details and sprinkled it with silver glitter - problem solved!

The new products that I've pre-viewed here are:
Mixed Borders          141932
Love & Affection       141545

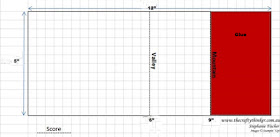
Dimensions for the horizontal easel card
.  Cut a piece of Basic Gray cardstock to 9" x 6"; scored on the long side at 4 1/2" and 6 3/4"
.  Cut a piece of Basic Gray cardstock to 6" x 4 1/2" for the front of the card
.  Fold as shown in diagram and adhere the front panel.
The Crafty Thinker, Stephanie Fischer, Fun Fold, Horizontal Easel Card tutorial
Diagram 1 for Horizontal Easel Card

The Crafty Thinker, Stephanie Fischer, Fun Fold, Horizontal Easel Card tutorial
Diagram 2 for Horizontal Easel Card


Thank you for visiting
'Til next time
Stephanie

Current Product List - click on any of the images to purchase from my online store

Saturday, 23 April 2016

2016-2018 In Colours - Colour Charts for Blue & Green

As a little exercise for myself, I made up little boards of the Blues and Greens including the brand new In Colours for 2016-2018: Dapper Denim and Emerald Envy.
SU, Stampin Up, Colour Board, 2016-2017 In Colours, Dapper Denim, Emerald Envy
Blue and Green colour boards incorporating the new In Colours: Dapper Denim and Emerald Envy
I find it useful to have these little boards when I'm selecting tones to work together as well as deciding which colours play together well.

I added Pool Party to the Emerald Envy board as a reminder to myself of possibilities.

I cut out my little squares with one of the new Layering Squares Framelits - how nice to have 19 framelits (a combination of plain and scalloped) that layer so closely together.

I'll be making boards for the remaining colours in the next few days if you'd like to check back.

Thanks for visiting
'Til next time
Stephanie

Friday, 22 April 2016

Sneak Peek - 2016-17 Annual Catalogue - Affectionately Yours

I fell in love with this suite of goodies the moment I saw it!  There are some beautiful papers in the DSP pack and I love the little embossing folders! (There are two designs in the pack).

SU, New 2016-17 Annual catalogue, Love & Affection, Floral Affection

For this card I used the letterpress technique with Night of Navy ink on Crumb Cake cardstock.  I added one of the gorgeous Classy Designer buttons (carrying over from the current catalogue) that we were given at On Stage and I would have loved to have threaded it with the new Night of Navy Solid Bakers Twine!  Instead, I hunted through the sewing box I inherited from my mother and found a gorgeous old reel of Button Thread.  It's the wrong colour but, feeling sentimental, I used it anyway!  I hate to think how old it is!

The Crafty Thinker, #thecraftythinker


SU, New 2016-17 Annual catalogue, Love & Affection, Floral Affection
For this card, I embossed a piece of Night of Navy cardstock and then used a sponge dauber to rub Whisper White Craft Ink over it.   The little matching stamped flower is from a stamp set that I received at On Stage, called Love & Affection.  It doesn't show in the picture, but I added clear Wink of Stella to the petals and gold Wink of Stella to the centre.  I punched it out with a 1 3/8" circle punch.

These are the new products I used:

Affectionately Yours DSP                  141632
Floral Affection Embossing Folder    141713
Love & Affection stamp set               141545

Thank you for visiting today.  If you click this link   - it will take you off to see wonderful projects from other members of the Crazy Crafters Team - they're very talented so it's really worth the visit!
You can also vote for your favourite projects and find out who  won last week (7.30pm AEST 22/4/16 to 29/4/16).

'Til next time
Stephanie

Thursday, 21 April 2016

Starfish wedding card

I was recently commissioned to make a wedding card and so my thoughts immediately turned to hearts, white on white, flowers and all the usual suspects.  So I was quite taken aback when I asked "is there anything particular you would like on the card?" and the response was "Yes, a starfish"!

It all made complete sense, once I discovered that it's for a beach wedding and there was a starfish on the invitation!  However, I found it challenging to think of a way to make a starfish romantic or wedding-y, so eventually I decided to add tropical-looking flowers!

This is the result.  
SU, Easel Card, Corner Garden, Picture Perfect, Starfish, shells, By The Tide, Wedding card
So where is the starfish? !!

Sadly three of the four stamp sets that I used will be retired on 31st May, so if you like them - jump in quick to buy them before they're all sold out!  

Retiring Products
You can click here to shop for retiring items, some of which are discounted by as much as 50%!

Back to the card!

I made the easel card from Crumb Cake cardstock.  It's not quite a square card, measuring 5" across and 6" high (when closed).  To achieve this, I cut a 12" x 5" piece of cardstock and scored the long side at 6" and 9".  I also cut a piece 6" x 5" for the front of the card.  For folding and gluing instructions, please see the foot of this post.  Line up the front of the card and adhere it to the glued panel.

I heat embossed the Corner Garden stamp in silver onto Whisper White cardstock and then watercoloured it with Crumb Cake ink.  Then I trimmed the panel to size and added a Basic Black mat 1/8" larger and adhered that to the front of the card.

I added the sentiment from the For the New Two set using Basic Black ink and watercoloured the little flowers with Crumb Cake ink.

SU, Easel Card, Corner Garden, Picture Perfect, Starfish, shells, By The Tide, Wedding card

I stamped the starfish (from Picture Perfect - the only set is continuing into the new Annual Catalogue) in Crumb Cake, fussy cut it and sponged the edges with Crumb Cake and Early Espresso.

The shells from the By the Tide stamp set received similar treatment - I also reinforced the shading by watercolouring with Early Espresso ink.

I only glued the front two legs of the starfish into place and added a dimensional towards the centre of the creature to encourage the remaining three legs to support the easel when the card is open.... a very obliging starfish!
SU, Easel Card, Corner Garden, Picture Perfect, Starfish, shells, By The Tide, Wedding card

The sentiment inside is also from the For the New Two set.

Thank you for your visit.

'Til next time
Stephanie


Stampin up, SU, Easel Card Tutorial, Easel Card, Fun Fold, The Crafty Thinker

Stampin up, SU, Easel Card Tutorial, Easel Card, Fun Fold, The Crafty Thinker

Product List - Click on an image to make a purchase