Pages

Friday, 14 August 2015

Crazy Crafters Blog Hop August 2015 - Stamp-a-stack using a Bundle


Welcome to the Crazy Crafters blog hop for August.

You may just be starting the blog hop here at my blog or may have come from the person before me in the list below. If you get off track at any time, the full line-up below will help you move along from blog to blog so you see all the projects. At the moment you are visiting Stephanie Fischer, The Crafty Thinker.
This month we are excited to showcase some of the amazing Bundles in the new Annual Catalogue by creating stacks of different cards using the same bundle.  

SU, Beautiful Bunch Bundle, Fun Flower Punch, Petite Petals Punch, 3D leaf
Bundles: Vintage Leaves & Beautiful Bunch
What's better than being able to buy punches or dies to match stamp sets (for those of us that aren't natural fussy cutters!)? Buying them as a bundle and saving 15%!!  

There are loads of bundles in the new catalogue (and even more coming in the soon-to-be released seasonal catalogue!) - so there's really something to suit everybody's tastes and needs.

I've used two bundles for my stack of cards: Vintage Leaves (stamp set and matching framelits) and Beautiful Bunch (stamp set + Fun Flower punch).

SU, Beautiful Bunch Bundle, Fun Flower Punch, Petite Petals Punch, 3D leaf
Coloured leaves & dimensionals for interest

This is the first of my three cards.  I layered English Garden DSP onto a Soft Suede card base.  Then I made a square frame by layering So Saffron onto Old Olive.  Then I arranged my leaves and flower.  I used some dimensionals to add depth and interest. I stamped the frame from Awesomely Artistic in Soft Suede onto So Saffron with a sentiment from Teeny Tiny Sentiments in the centre.  I cut this out using the matching framelit from the Project Life Cards and Labels set.  I cut a banner (using the Triple Banner Punch) from Old Olive and layered the sentiment on top. I attached the banner to the card with dimensionals.


The flower:
The flower is stamped in Soft Suede onto Cajun Craze.  After punching it out, I attacked it with my bone folder to give it some dimension.  The centre is another of the stamps from the Beautiful Bunch set, stamped in Soft Suede onto Soft Suede card and punched out with the Petite Petals punch.  It received the same bone folder treatment!  I stuck a metal Rimmed Pearl in the centre.
SU, Beautiful Bunch Bundle, Fun Flower Punch, Petite Petals Punch, 3D leaf
Rich colours in the flower & leaves

The next card is very similar but the base card is Old Olive.  The frame is rectangular with So Saffron layered onto Soft Suede.  It doesn't show in the photo (because it's very subtle) but I randomly stamped some of the leaves in Versamark onto the So Saffron layer.  The flower is stamped in Soft Suede onto Cherry Cobbler but centre remains Soft Suede.  I used a different Teeny Tiny Sentiment and after cutting out the frame I sponged the edges with Soft Suede ink.  I attached the leaves and flower using some dimensionals as before.


The leaves:
I stamped out all the leaves using a mix of green inks.  I inked the entire leaf with Crushed Curry and then randomly sponged some Garden Green and Mossy Meadow onto the stamp before stamping onto my Very Vanilla card.  It looked very effective  but with all the colours I put on top later- my efforts may have been wasted! 
The Crafty Thinker, How to make realistic stamped leaf
Finished leaves after sponging
The Crafty Thinker, How to make realistic stamped leaf
After watercolouring: Some leaves had too
much water - but it didn't really matter in the end!
 My next step was to watercolour the leaves using a mix of Pear Pizzazz, Old Olive, Garden Green and Mossy Meadow ink and I took no care at all!  Once they were dry, I felt they lacked vibrancy so out came the sponge daubers and I sponged on some Cucumber Crush and Garden Green, using a little Cajun Craze here and there to define them and give them a bit of life.
SU, Beautiful Bunch Bundle, Fun Flower Punch, Petite Petals Punch, 3D leaf
Versamark stamping in the background for subtle elegance
This is the last card I made.  After cutting out the DSP for the previous two cards I was left with a strip of it that I decided to use for this card.   So I layered it onto a leftover piece of Soft Suede.  I randomly stamped leaf images onto a piece of Mint Macaron with Versamark and then inked the edges with Mint Macaron ink.  I layered that onto a base card of Mint Macaron for a subtle and elegant appearance.  I positioned my DSP strip and then went to work with my leaves and flower!  This flower is also stamped in Soft Suede onto Cherry Cobbler card with a Soft Suede centre and another Metal Rimmed Pearl.


I hope you've enjoyed these cards, I would really welcome your comments.

Thanks for taking part in our blog hop, there are so many amazing ideas and so much inspiration you don't want to miss. Remember that currently you are at my blog - Stephanie Fischer, so check the blog hop line up list to see who is next in the list and click on their name as you don't want to miss out on seeing any of the blogs and the amazing inspiration they contain. 

See you next time
Stephanie

Built for Free Using: My Stampin Blog

Woodland 3 ways

The Woodland Embossing folder is one of the great new products in the 2015 Holiday Catalogue which will be launched on 1st September.  One of the benefits of being a Demonstrator is the pleasure of pre-ordering from new catalogues.

I can't believe that I nearly didn't buy this beautiful embossing folder!  It took me a while to see its versatility and what I could do with it.  I really had a lot of fun with it yesterday!
SU, sponged embossing, coloured embossing, masculine card
There's a masculine feel to this card
 I thought this would be good for a masculine birthday card.  I embossed some Lost Lagoon card and then sponged the trees with Lost Lagoon and Soft Suede.  Then I layered it onto a piece of Soft Suede before adhering it to my Island Indigo card.  I stamped, coloured and fussy cut the stag from the Wilderness Awaits stamp set and then stamped the greeting from Tag Talk in Soft Suede onto Sahara Sand card and punched it out.   

SU, Xmas card, Hello December 2015, bending stamps
"Hello up there!"
   This time I embossed Whisper White cardstock.  I ran my 2-way glue pen over the embossing and then sprinkled with Dazzling Diamonds glitter. Then I layered this onto my card of Thick Whisper White.  I stamped the bear from White Christmas, added a little shading with Soft Sky ink and fussy cut him before sticking him down.  He's looking up at the bird from Santa's Gifts which I stamped onto Whisper White, Coloured and cut out.  The greeting is from Happy Scenes - I just manipulated it to fit into the banner from Project Life Hello December 2015 (one of the advantages of photopolymer stamps!).  I coloured it with Soft Sky and Pool Party inks and cut it out.  I placed it at an angle in the corner to complete my triangular composition.
SU, Christmas Card, Inking embossing folders
Let's go, Rudolph!
I inked my embossing folder with Soft Sky ink before I added the Whisper White card and ran it through the Big Shot to get a coloured background.  Santa and rudolph are both from the Santa's Gifts stamp set.  I added some Dazzling Diamonds to Santa's fur and Rudolph's nose.  The greeting is from Petite Pairs which I punched out with the Large Oval punch.  The base card is Soft Sky. 

I hope you enjoyed these cards.

 The Holiday Catalogue is being launched on September 1st 2015! Would you like a copy now so that you can start looking at all the amazing new products (not all limited to Seasonal products)? You can! Please ensure that you read these requirements - 

  • Australian Resident
  • Currently NOT a Stampin' Up! Demonstrator
  • If you have a demonstrator that you order through - to be fair to both them and me, please ask them for a catalogue.
  • You are happy to order product through me
http://eepurl.com/bvyOPz

If you can't wait - then join now and shop for new Holiday Catalogue items right now PLUS at a discount! $235 of ANY product you like and you only pay $169 PLUS free postage. Its such a great deal - you then get 20% off any items you purchase after you sign up for the starter kit. There is no obligation to sell - you can join just to get great products cheaper.
https://Ida.stampinup.com/demoid=4010442

'Til next time
Stephanie

Sunday, 9 August 2015

Holiday Catalogue 2015 - Sneak Peak!

Christmas sleigh ride!  

I know, we don't have snow at Christmas in Austalia .... we still like our traditional (Northern Hemisphere) Christmas images though, to get us in the spirit!

SU, Sleigh Ride Edgelits, Softy Falling, snow scene, Christmas silhouettes
The lights are on but is anyone home?
I set out to create depth by placing dark colours in the foreground fading to lighter in the background.  By using a monochromatic colour scheme, I was aiming to evoke a silent, late night sleigh ride.  The only colour comes from the cosy, warm houses on the distant hill.

This card provides a sneak peak at several new products in the Holiday Catalogue:
  • Softly Falling Embossing Folder
  • Sleigh Ride Edgelits
  • Glitter ribbon (it will also be available in gold) - NB I used two pieces side by side on this card.
I also used the Lots of Joy stamp set, the star from the Itty Bitty Accents punch set, Tags & Labels Framelits and some silver glimmer paper - all from the Annual Catalogue. 

I've added a little of black ribbon from my stash and a couple of tiny crystals.


The Holiday Catalogue is being launched on September 1st 2015! Would you like a copy now so that you can start looking at all the amazing new products (not all limited to Seasonal products)? You can! Please ensure that you read these requirements - 

  • Australian Resident
  • Currently NOT a Stampin' Up! Demonstrator
  • If you have a demonstrator that you order through - to be fair to both them and me, please ask them for a catalogue.
  • You are happy to order product through me
http://eepurl.com/bvyOPz

If you can't wait - then join now and shop for new Holiday Catalogue items right now PLUS at a discount! $235 of ANY product you like and you only pay $169 PLUS free postage. Its such a great deal - you then get 20% off any items you purchase after you sign up for the starter kit. There is no obligation to sell - you can join just to get great products cheaper.
https://Ida.stampinup.com/demoid=4010442


You can order an item by clicking on the picture below.
Built for Free Using: My Stampin Blog

Thursday, 6 August 2015

No Bones About It - Dinoparty!

If you saw my previous post featuring dinosaurs, you may be wondering .... what happened next?

Even if you aren't wondering - I'm going to tell you now!
SU, Santa's Gifts, No Bones About It, Dinosaur card, Boy's card
Continuing the story of the Dinosaur Party
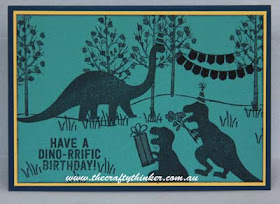
On the front of the card, the T-rex couple are arriving at the party, bearing their gifts, while the brachiosaurus puts the finishing touches to the bunting in the trees (who better to reach high enough?).
SU, Santa's Gifts, No Bones About It, Dinosaur card, Boy's card
T-Rex's bringing gifts
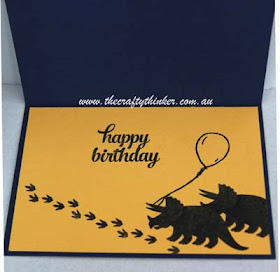
Inside the card, we find our two Triceratops friends.  They haven't quite made it to the party yet, but they're close and they're bringing a balloon as their contribution to the festivities!
SU, Santa's Gifts, No Bones About It, Dinosaur card, Boy's card
Triceratops couple bring a balloon, following the T-Rex footprints

The card is Night of Navy with layers of Daffodil Delight and Lost Lagoon (doesn't that just sound like an inviting name for a dinosaur?!).

I have used black ink everywhere.  The only exception is the Smoky Slate marker I used to fill in the flowers, tree trunks and parcel.  I also used a Basic Black marker on the bunting to hide the "Merry Christmas" wording!

Can you pick all the stamp sets I combined in these little scenes?

Ready for the answer?...

No Bones About It (that was easy!)
White Christmas (the trees and bunting)
Sheltering Tree (the leaves on the trees)
Santa's Gifts (the parcel)
Hey Girl (the grass, balloon & string)
Tin of Cards (the birthday sentiment inside the card)

Til next time
Stephanie

Monday, 3 August 2015

Creative Crew August Challenge - Saying "Goodbye" to Summer - Colour

Colour Focus

Well, all good things must come to an end and I'm sad to say that this is my last month on the Creative Crew team.  It's been such an honour to be part of this team and also very enjoyable - I'm going to miss it but wish the new team all the best - I know they'll come up with lots of beautiful inspiration for us all.

CCREW0815DF
Can this be "Goodbye" to Summer??  

What can I say - any theme based on seasons is going to end up topsy turvy in one part of the planet or another!  But I rather enjoyed putting my numbingly cold winter hands to work with some lovely warming colours!  I feel warmer just looking at this card!

SU, Birthday Blossoms, make a symetrical label with tags & labels
Heat Embossing with an embossing folder
The top layer uses the emboss resist and stamping with an embossing folder techniques.

I used versamark to ink up the Lovely Lace embossing folder, placed a piece of Whisper White card stock on top and pressed it evenly with my hands.  Then sprinkled with gold embossing powder and applied heat with a heat gun.

Then I used sponge daubers to apply ink: Cherry Cobbler at the bottom, Watermelon Wonder in the middle and Crushed Curry at the top.  I took a bit of care to blend the colours and wiped the ink off the embossing with a tissue and added a few Candy Dots in Cherry Cobbler and Crushed Curry.

I stamped a flower from Birthday Blossoms in Versamark onto the Crushed Curry card stock and heat embossed with gold embossing powder.  Then I sponged carefully and lightly with Cherry Cobbler and Watermelon Wonder - fading out towards the ends of the petals.  Then I cut out the flower. 

The little flower is punched from Crushed Curry card stock with an Itty Bitty Accents punch, the centre and edges are sponged with Watermelon Wonder and then I put a Cherry Cobbler Candy Dot in the middle.

The Sentiment is from Birthday Blossoms and I stamped it onto Whisper White using Cherry Cobbler ink. I sponged Crushed Curry ink into the banner by just using an edge of a sponge dauber.

I used the Tags and Labels Framelits to cut the sentiment into a symetrical label using the method I describe in this post.  I sponged the edge quite generously with Crushed Curry ink and then added a thinner edge of Cherry Cobbler.  Then I made a slightly larger label with Crushed Curry card stock and layered them together before sticking them to the card with dimensionals.

The card is made from Watermelon Wonder card stock layered with Cherry Cobbler and Crushed Curry.

Do join in the fun - whatever season you're currently experiencing!  I look forward to seeing your creations at Splitcoaststampers.

Thanks for looking.
Stephanie


Built for Free Using: My Stampin Blog

Creative Crew August Challenge - Saying "Goodbye" to Summer - Catalogue

Catalogue Focus

Well, all good things must come to an end and I'm sad to say that this is my last month on the Creative Crew team.  It's been such an honour to be part of this team and also very enjoyable - I'm going to miss it but wish the new team all the best - I know they'll come up with lots of  beautiful inspiration for us all.
 
CCREW0815CF
Adios, Lazy Days of Summer!  Now is the time for all summery goodies to rock your stamping table!  No summertime stamps?  Let your project take us away on a splendid summer vacation in any way you wish!

Well, it might not be a vacation, but to me roses represent Summer!  And my favourite roses are a combination of yellow and pink. 
SU, Deco Labels Collection Framelits
Z-fold card featuring Timeless Elegance DSP
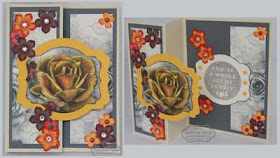
You may have noticed that I really love the Timeless Elegance DSP!  It's so versatile and so easy to dress up - just add a little colour.  Here I watercoloured one of the rose images and cut it out with the Deco Labels framelits and edged it with black ink.  I layered this onto Crushed Curry, which I cut with the next size up of framelit.

I stamped with a Petite Petals stamp onto Crushed Curry and Basic Grey with Watermelon Wonder and punched them out with the matching Petite Petals punch.  Then I punched  little flowers from Crushed Curry, Watermelon Wonder and Basic Grey with the Itty Bitty Accents punch.  The centres of the flowers are a combination of Candy Dots and Rhinestone Basic Jewels.

The fold is a Z-fold from Naturals Ivory card stock (I missed it's retirement - sorry.  However, Very Vanilla would do the trick) which I layered with Basic Grey and Timeless Elegance DSP.
SU, Deco Labels Collection Framelits, The Crafty Thinker
Timeless Elegance DSP

I used the smaller of the two framelits to cut another label in Very Vanilla.  I stamped the circular image from A Whole Lot of Lovely in the middle, edged it with black ink and added some Crushed Curry Candy Dots.  Then I stuck this to the inside part of the card so that, when the card is closed, it is hidden by the yellow label on the top of the card.

Then I liberally sprinkled my card with the little flowers to end up with a summer garden.

Join in the fun at Splitcoaststampers.

Thanks for looking.
SU, Deco Labels Collection Framelits
Z Fold card
Stephanie.


Built for Free Using: My Stampin Blog

Creative Crew August Challenge - Saying "Goodbye" to Summer - Holiday

Holiday Focus

 Well, all good things must come to an end and I'm sad to say that this is my last month on the Creative Crew team.  It's been such an honour to be part of this team and also very enjoyable - I'm going to miss it but wish the new team all the best - I know they'll come up with lots of  beautiful inspiration for us all.

CCREW0815HF
You can be the dreamer here:
3 August  National Watermelon Day
10 August National S'mores Day
13 August Left Hander's Day
14 August V-J Day
30 August National Marshmallow Toasting Day

As an Australian, I have chosen to highlight an Australian national day.  Friday 28 August is Daffodil Day - something very close to my heart.

What is Daffodil Day?  It's an annual fund-raising event run by the Cancer Council of Australia when we buy daffodils or daffodil pins to help support vital cancer research, develop cancer prevention programs, and provide patient support (like Cancer Council 13 11 20) for the tens of thousands of Australian lives affected by cancer.  Daffodil Day is a day when we can all show we care about beating cancer.

The Daffodil is a hardy annual flower that pushes its way through the frozen earth after a long winter to herald the return of spring, new life, vitality and growth - it symbolises rebirth and new beginnings.  So it was chosen by the Cancer Counil to represent hope for a cancer-free future.

SU, English Garden DSP, Fun Flower Punch
Centre Step Card to celebrate Daffodil Day


I just love Step Cards - they're so quick, easy and effective!  This style of Centre Step Card is one of my go-to folds!  There are many tutorials available.

The base is Mossy Meadow, layered with Hello Honey and English Garden DSP.   I used the Ovals Collection Framelits to layer Mossy Meadow and Whisper White.  The edge of the white oval and all the DSP is inked with Hello Honey.

The ribbon is Hello Honey Quilted Cotton which I found in my stash.  I'm sorry that it's retired.

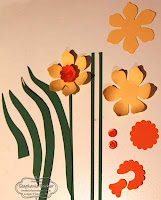
To make the daffodils I used the Fun Flower punch with Crushed Curry cardstock (edged with Hello Honey ink) and the 1.25" Scallop Circle punch with Pumpkin Pie cardstock with a little Pumpkin Pie button in the centre.  The leaves are free cut from Garden Green cardstock.


SU, Punch Art, Daffodil, 3-D flower
How to make a daffodil

This picture of the flowers in progress is probably worth more than a thousand words in describing how I made the daffodils!

Once I'd trimmed the scallop circle, I put a glue dot behind one end to stick it to the other end - this makes the daffodil trumpet.

I used the bone folder on the yellow petals to add depth and then glued the trumpet and a button into the middle of the flower.

Have fun with this challenge, wherever you are and whatever you choose to celebrate!  I look forward to seeing your creations over at Splitcoaststampers!


Thanks for looking.
Stephanie

Built for Free Using: My Stampin Blog

Creative Crew August Challenge - Saying "Goodbye" to Summer - Scrapbook & More

SCRAPBOOK & MORE FOCUS

Well, all good things must come to an end and I'm sad to say that this is my last month on the Creative Crew team.  It's been such an honour to be part of this team and also very enjoyable - I'm going to miss it but wish the new team all the best - I know they'll come up with lots of beautiful inspiration for us all.

CCREW0815SF
Vacation, summer play, family fun times, swimming, canoing, camping, family reunion gatherings (invitations?) and whatever else you can conjure up to signify the celebrations of Summer!  Not a scrapper?  Anything 3-D, mini-albums, giftables, fun fold.  Whatever it is .... no stressing ... just have fun!

Although I'm not a scrapbooker, this challenge had me hunting through old family holiday photos with the thought of creating a scrapbook layout.  And I found this .....

Yes, that's me!  I don't know where I found the dead fish but I clearly wasn't too impressed!

Eventually I gave up on the idea of a scrapbook page but the photos had me thinking about my childhood.  We lived in a "seaside resort" (more correctly - the Thames Estuary!) and were lucky enough to have one of the much sought after beach huts which had a little kitchen so that my grandmother could have her cup of tea at the beach! 

I used to avoid putting my feet down once I'd started swimming because they would sink into soft, silky "mud" and my imagination used to work overtime thinking about what my toes might encounter there!

SU, From Land to Sea, Easel Card, Sprinkles of Life, Happy Birthday Everyone
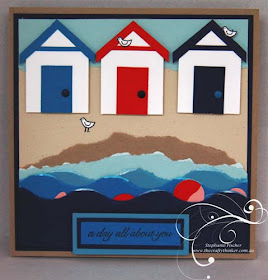
Beach scene with swimmer
Mixing with the Ozone odour would be the aroma of fish and chips with vinegar and there was the sound of the waves and laughter overlaid with the cries of the sea gulls wheeling overhead - always on the lookout for dropped or abandoned food.

So I recreated my beach scene on a 6" square card front of Crumb Cake.  I made three white rectangles which I dressed with little strips of coloured card to create roof lines and gables - then I trimmed off the excess white along the roof line.  The doors are a simple rectangle of matching card with a Candy Dot handle.  The colours are Pacific Point, Real Red and Night of Navy. The "sea gulls" are stamped in black on Whisper White using the little bird in the Sprinkles of Life stamp set. I drew in legs with a black Stampin' Write marker for the bird standing on the sand.

The dry sand is Naturals Ivory cardstock (which I've since realised is retired) to which I stuck a torn piece of Crumb Cake for the wet sand. 

Then I tore strips of blue card stock: Soft Sky, Marina Mist, Pacific Point and Night of Navy.  The three darker shades I tore into curvy waves and the lightest shade, breaking on the sand, I tore a bit less curvy.  The other part of the torn Soft Sky card I turned upside down to become the sky.  I added white caps (or surf) to my waves with White Craft ink (which took a long time to dry!).
SU, From Land to Sea, Easel Card, Sprinkles of Life, Happy Birthday Everyone
Swimmer - who knows what lies beneath!
SU, Punch Art, Swimming person, Waves
Creating a swimmer in the waves
While the surf was drying, I thought about how to build my swimmer and it turned out to be easier than I expected!  I punched 3/4" circles in Real Red and Blushing Bride and a 1/2" circle in Blushing Bride.  I cut a piece off the red circle to form a swimming cap which I stuck to the pink circle of the same size.  The small piece I had cut off became a bottom!  I cut two pieces from the smaller pink circle to form a hand and foot.  Then I distributed the bits of swimmer between the waves.

I used the jellyfish from the From Land to Sea stamp set to represent my childhood fears of what lay below!  I clear heat embossed it on Whisper White and then sponged with  Pacific Point and Night of Navy.  I stuck this to a piece of Night of Navy cardstock and, with the use of dimensionals, this became the mechanism to hold up the easel card.

I stamped sentiments from Happy Birthday Everyone to complete my day at the seaside birthday card for my very dear friend of more than 50 years!
SU, From Land to Sea, Easel Card, Sprinkles of Life, Happy Birthday Everyone
Greeting & more gulls inside
I hope you like it.  Please join in the Challenge over at Splitcoaststampers!

Stephanie


Built for Free Using: My Stampin Blog