LIFE'S A PICNIC
Play along with the Creative Crew to get those creative juices flowing!
See the Creative Crew Gallery here for further inspiration.
 |
| Double Porthole card |
Anything foodie related, a stamp set, punches, you name it!
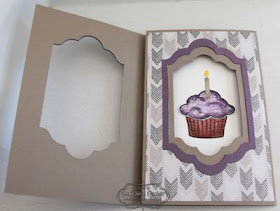
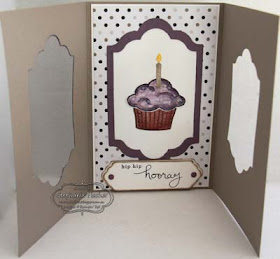
Sprinkles of Life really is turning into one of my "go to" stamp sets - I love it because it's so versatile! Here I've stamped and coloured the image using Chocolate Chip, Perfect Plum and Elegant Eggplant. The candle is Tip Top Taupe with a Daffodil Delight and Crushed Curry flame. I added Dazzling Details to the icing.
I really don't know what this fold should be called but I call it a double porthole. The base cardstock is Tip Top Taupe with three designs from the Go Wild DSP stack.
How I did it:
- I started with a 6" x 12" piece of Tip Top Taupe which I scored at 4" and 8" (neatly dividing it into three).
- I folded both sides in towards the centre, overlapping them with the left side on top.
- I adhered a piece of DSP to the top flap.
- I unfolded the card, used the second largest Lots of Labels framelit and carefully positioned it on top of the top flap and ran in through the Bigshot so that only the top layer was cut.
- Using Perfect Plum cardstock I cut a frame using the largest and second largest of the Lots of Labels framelits and adhered it to the front of the card.
- I refolded the card and lightly drew around the inside of the cut with a pencil to help me centre the die cut in the second flap.
- I wanted to leave a frame of Tip Top Taupe showing around the inside edge when the card is closed.
- I opened out the card again and centred the third largest die in the set and ran it through the Bigshot.
- I cut a piece of DSP to size, held it in position on top of flap 2 (with the smaller die cut), folded the top flap over and lightly drew around the inside of the cut shape again.
- Then I placed the DSP in the Bigshot with the second largest die in position directly lined up with the pencil marks) and ran it through.
- Then I adhered the DSP to the second flap, being careful to line it up with the die cut in the front flap. So now I had decorated my second flap but still kept the Tip Top Taupe frame that I wanted.
- I cut another Perfect Plum frame by repeating step 5 and adhered it to this second layer.
- I centred a piece of Whisper White to the inside of the card and then cut a third piece of DSP to size. I didn't want any of this DSP to show when the card is closed, so I repeated steps 9 & 10 and then adhered this DSP to the Whisper White.
- I then added a Perfect Plum frame by repeating step 5.
- I then closed the card before I adhered the cupcake, to help me position it where I wanted within the frame I had just created for it.
- I placed a piece of Whisper White on the back of the card to provide somewhere to write a message.

Sprinkles of life & Go Wild DSP
The sentiment is from Endless Birthday Wishes. I stamped it in black onto a 1" strip of thick Whisper White and then trimmed just the ends with one of the Tags & Labels Framelits (I've included instructions for this below). Then I edged the resulting label with Tip Top Taupe and attached a couple of Perfect Plum Candy Dots (even they sound foodie!). I repeated the process with normal Whisper White cardstock (without the sentiment and candy dots!) but just a tad longer. I adhered the longer layer with snail and then added the top layer with dimensionals.
 | |||
| Sprinkles of life, custom made label |
Making a symetrical label with the Tags & Labels Framlits:
- I stamped my sentiment on a 1" strip of cardstock.
- I then fed one end of the strip through the framelit so that only the end of the strip was under the cutting blade (making sure it was straight). I cranked just that end through the Bigshot to avoid leaving any impressions on the rest of the strip.
- I then repeated the process on the other end of the strip.
 |
| Custom made label, Step 3 |
 | ||
| Custom made label, Step 2 |
 |
| Custom made label - to simply extend the length of the die cut, stop at this step |
CCREW0715DF, CreativeCrew, SUO - DSP/Colour Focus
Cucumber Crush, Hello Honey and Watermelon Wonder - for more inspiration use the Cherry On Top DSP Stack!
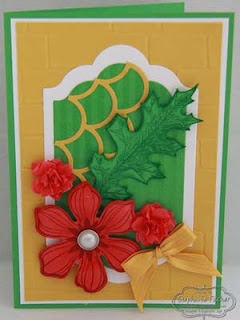
OK, I'm going to be brutally honest here - I really don't like Cucumber Crush; either on its own or in combination. So..... I've really struggled with this challenge. I'm not thrilled with my results but I'm happy that I managed to produce something. I suppose the flowers, wall and leaf give it a very loose outdoors connection, then we have to make a leap to picnic!
 |
| Beautiful Bunch, Striped Scallop Thinlit |
The leaf is stamped in Garden Green onto Cucumber Crush using the Vintage Leaves stamp set and cut with the matching Leaflets Framelit. I also added a little bit of Delightful Dijon cut with the Striped Scallop Thinlit.
The large flower is stamped with Cherry Cobbler ink onto Watermelon Wonder cardstock with the Beautiful Bunch stamp set and cut with the matching Fun Flower Punch. I added the largest of the Metal Rimmed Pearls to the centre.
The two smaller flowers are cut from the Watermelon Wonder Cotton Paper with the Petite Petals Punch and then scrunched up around a really small brad.
I wanted to add a bow but didn't want to use the Dotted Lace Trim, so I used the now retired Stitched Satin Ribbon in Crushed Curry which seemed to do the trick.
The remaining two July Challenges follow in Part 2.

This is a work of art! I imagine you spent quite a bit of time making this and hope the receiver appreciates it. I'm not sure if I have the energy or ability to spend on the cutting. Thank you for sharing your instructions just in case I get brave and have enough time to CASE it! Love the colors you chose.
ReplyDeleteThank you Karen. Yes, the recipient was very appreciative!
DeleteIt's actually not as difficult as it may seem - let the Big Shot do the work!