Pages

Friday, 27 February 2015

Great new Sale-A-Bration products

Just when we thought Sale-A-Bration couldn't get better ... it did!  During March (sadly the last month of Sale-a-bration) there are four more great products to choose from with every $90 spent .... and they're FREE!!!  Who doesn't love a freebie?!

I like these products so much I feel like Stampin' Up! left the best for last!

One of the wonderful perks of being a Demonstrator is that we're the first to get to play with new things and I had a lovely afternoon  yesterday playing with my new toys!
Stampin' Up! Saleabration 2015 bonus productsStampin Up saleabration 2015 bonus products


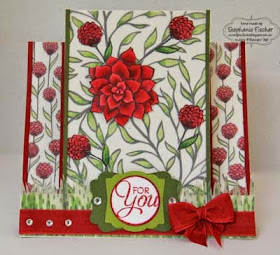
For this card I used the new Sale-a-Bration products; Nature's Perfection stamp set and Sheer Perfection Designer Vellum Stack which go together perfectly!

The vellum is gorgeous as it is but I decided to add some colour with my Blendability alcohol markers.

These are the new offerings - but remember they're only available during the month of March then they'll disappear forever!
To take advantage of this great offer Shop Now or contact me.
Built for Free Using: My Stampin Blog

Monday, 23 February 2015

Guy Greetings Peak A Boo card

One of our dearest family friends celebrates his 80th birthday this week so I wanted to make something a bit special for him and was inspired by a tutorial I received from Splitcoaststampers recently.
Admittedly, "Peak-A-Boo" doesn't seem like it would have much masculine gravitas attached to it but, hopefully, this card will dispel such thoughts! 

The Chocolate Chip base colour and Guy Greetings images manage to retain their masculine edge despite the added bling and glitter!

Unfortunately, the Designer Series Paper I used has been retired as it remains one of my favourites.  Also retired is the edge punch, which I shall soon replace with the Finishing Touches Edgelets dies. The bling and glitters have been knocking around in my craft room for quite a few years now but everything else I used is currently available.  I used Heat & Stick powder to adhere the glitter to the card.

I just love this clever card fold and can't get enough of opening and closing the card to see the images change!  Thanks to Norma Lee at Splitcoaststampers for her great tutorial.

'Til next time
Stephanie
Built for Free Using: My Stampin Blog

Sunday, 22 February 2015

The Butterfly of Gratitude

Stampin Up handmade card thank you
Sitting on the windowsill with the light behind it's vellum wings,
the butterfly looks ready to fly off into the garden!


As promised, here's another card that I made whilst challenging myself to be creative with the Striped Scallop thinlet.  This time I spritzed a mixture of reinker and water over the mask that I'd made.

I wanted to make a more masculine thank you card and was pleased with the way it turned out.  Even though I added a butterfly, I think it's a manly butterfly!

CLASSES & WORKSHOPS NOW BOOKING:
If you're interested in attending classes or workshops in the Castle Hill, NSW area - contact me or go to my Facebook Page for more details.


Stampin up, cardmaking, the crafty thinker
The butterfly wings curl up a little to create some extra dimension 

Built for Free Using: My Stampin Blog

Wednesday, 18 February 2015

Striped Scallop Sponged Background

Do you have things in your craft room that you bought because you loved them but that don't get as much use as you thought they would? 

I'll raise my hand and admit that I have a few, one of which is the Striped Scallop Thinlet.  I completely fell for it when I saw it but then I just seemed to keep overlooking it.  So, having come to this realisation a week or so ago, I challenged myself to use it as much as possible in as many different ways as I could .... and it's been a lot of  fun!

Sponged Striped Scallop background
This is a card that I made for a very special friend.  The Striped Scallop Thinlet makes its appearance in the sponged background.  The Blushing Bride flower uses the method that you can see here.
Layered Pansy Punch flower


Keep your eyes peeled - the Striped Scallop will be turning up in some form in a few more posts to come.  Did you notice it in the Twisted Easel card the other day?

'Til next time
Stephanie


Built for Free Using: My Stampin Blog

Monday, 16 February 2015

Stippled Blossom Extravaganza

Stippled Blossoms with masking technique
This is a card I made to illustrate a tutorial on the masking technique.  The colour combination was a bit of an accident!  In trying to decide between pink or yellow roses, I stamped a couple of each onto a piece of scrap paper.  It turned out I preferred the combination of colours!

I'm a big fan of masking because the results far outweigh the effort or skill involved!  Stippled Blossoms was one of the first Stampin' Up! stamp sets that I bought and it remains one of my favourites (along with Lovely As a Tree).  I get a lot of use from it because it suits so many occasions and love the look of the two-step stamping!

If you'd like to receive my tutorials and newsletters, remember to sign up!

'Til next time
Stephanie

Built for Free Using: My Stampin Blog

Friday, 13 February 2015

Twisted Easel Sympathy Card


One of the great things about card-making is that usually we are creating a card to celebrate a special occasion or a joyful event.  Occasionally, however, we find ourselves having to create a card for very different reasons. At those times, my mind often goes blank since I know that I’m making the card because somebody is in pain and going through very difficult times.
Twisted Easel Sympathy Card

Such is the case with today’s card.  I felt that one way in which I could express my love and support for my friend was to create a very special card for her.
Sentiment from Bloom With Hope

I must thank Laura Lipe at Smiles, Laura whose twisted easel cards inspired me.  I used the same basic design as Laura but decided to make mine a little larger at 6” square.   

The front panel is the wonderful  Irresistably Yours DSP free from the Sale-A-Bration Catalogue (Sale-a-bration runs until 31 March 2015).  
Striped Scallop Thinlet & Chalk Talk
'Til next time
Stephanie
Built for Free Using: My Stampin Blog

Sunday, 8 February 2015

Crazy Crafters Blog Hop - Celebrating Love

Hello and thank you for joining us on the Crazy Crafters Blog Hop.  This month, with Valentine's Day approaching, we are Celebrating Love.  We hope you'll find some inspiration or learn some new techniques during your journey with us.

When you've finished here, be sure to click on the big grey "Next" button to hop to the next stop.

I'm really honoured to be able to participate in a Blog Hop with a group of people who inspire me and whose work I really admire.  I would like to celebrate my first Blog Hop and so, any Australian Resident who subscribes to my mailing list during the month of February will go into a draw to receive a free 6" x 6" pack of Designer Series Paper.  There are three packs to be won.

I was so excited about the valentine card I created a few weeks ago for my husband that I had to post it right away - had I been sensible, I would have waited and included it today!  Instead, I had the fun of making another valentine card - this time I decided to make it feminine. 
Whilst I have no immediate need for this card, my husband and son do tend to raid my stash - even for cards to give to me!  (Their excuse being that they think my cards are the best and why would they give me second best?!!)  I choose to accept the compliment so there is every possibility that I will be opening this card on February 14th!

So how did I do it?
I bought the Seasonally Scattered stamp set mainly because I really like the other two stamps in the set but decided to give this one a go - I "stretched" the little dots though to fill the frame I wanted to use.  The heart at the bottom of the frame was punched with one of the Itty Bitty Accents punches

I scattered a few hearts punched with the Builder Owl Punch.  The Whisper White card stock was embossed with the Happy Heart embossing folder and the petticoat frills at the bottom were created with one of the Delicate Designs embossing folders.  I curved these up a little bit away from the card.

The flowers were made with the Petite Petals and Flower Shop stamp sets and Petite Petals and Pansy Punches.  You can see how I did that here on my previous post "Pansy Punch layered Flower Shop Flower".

If you have any questions, please contact me and I'll be very happy to share any tips, trick or how to's with you.

In the spirit of full disclosure, I should tell you that this was my second attempt! 
This is my first try.  I was actually a bit torn by this card.  I still haven't really decided if I like it or not.  Half of me likes the way the flowers seem to emerge from the Painted Blooms DSP and the other half of me (winning at the moment) thinks it's all too busy.

What do you think?

See you next time.
Stephanie

http://stampingwithrosalie.blogspot.com.au/2015/02/the-crazy-crafters-blog-hop-celebrating.html


Sunday, 1 February 2015

Masculine Valentine Cards

Guy Greetings Valentine Masculine
Stampin' Up! Guy Greetings
It feels like only yesterday that it was Christmas and already we're thinking about Valentine cards!

February is a very loved up month in this household - we celebrate not only Valentine's Day but also our wedding anniversary.  It's a wonderful opportunity for me to use my card-making in order to express my love and appreciation for my wonderful (and very patient!) husband.  It makes a refreshing change for him from the more usual "Have you done...?", "Did you buy ...?" etc !  So I'll be featuring two cards in this post: a valentine card and an anniversary card.

I always find masculine Valentine cards particularly difficult to do - I want to make the love clear but not in a girly way!  So I was very excited when I saw the Guy Greetings stamp set in the latest catalogue.  It's so versatile that I can see it featuring in many of my cards in the future!

So how did I do it?
At the base is a card made from an A5 piece of Basic Grey cardstock.  That is layered with a piece of Crumb Cake cardstock edged with Baked Brown Sugar ink.  The next layer is from the Adventure Bound Designer Series Paper Stack, also edged with Baked Brown Sugar.  The Crumb Cake Seam Binding Ribbon is adhered to this layer with the ends tucked underneath.

I cut two hearts from Cajun Craze cardstock.  I used the heart die from the Snowflake Card Thinlets set because I don't yet have the Sweetheart punch.  The edges were inked with Baked Brown Sugar and I placed an Antique Brad in the centre of each.  I adhered them to the card with dimensionals.

The figure from Guy Greetings was stamped onto to Very Vanilla Cardstock with Baked Brown Sugar and then I coloured him using Island Indigo, Baked Brown Sugar, Blushing Bride and an Aqua Painter.

I die cut the painted figure using the long, narrow die from the Chalk Talk Framelets set.  The little point at the end was eventually hidden.  I then cut mats to a suitable size from Cajun Craze and Crumb Cake, round cornered them and inked the edges with Baked Brown Sugar.

I stamped a sentiment from Guy Greetings onto Very Vanilla, cut it with a Deco Labels framelet and edged it with Baked Brown Sugar.  I stuck this on top of the ribbon using Dimensionals.
Partially heat embossed anchor

The anchor was stamped in black onto Very Vanilla.  After using my Stampin' Buddy, I used a Versamark Pen here and there and heat embossed with silver embossing powder.  I then coloured it using Cajun Craze, Baked Brown sugar and a tiny bit of black.  I fussy cut the anchor and glued it to the frame above the sentiment.

I cut the pointy bits from the back of two Antique Brads then adhered them to the ribbon.


Anniversary Card
Masculine Valentine or anniversary Card
I layered Smoky Slate onto a Real Red card base.  I used one of the dies from the Chalk Talk framelet set to cut a hole in a layer of Basic Grey which I then embossed with the Happy Heart embossing folder (being careful to keep the hearts going in the direction I wanted).  

The sentiment was stamped onto the Smoky Slate layer so that it would be centred in the cut out in the top layer.  I then adhered the top layer using dimensionals.

I adhered a row of hearts (cut from the Stacked with Love series) using dimensionals at the top of each heart.  Two overlapping hearts were stuck onto the ribbon and I cut some little Real Red hearts using the Owl Punch and scattered them.

With the addition of a bow and a little bling it seemed to express a serious amount of love without losing too much of a masculine edge.

The sentiments were from Guy Greetings and also Simply Wonderful (which is from the Saleabration Catalogue)

 Take a look at my Saleabration page to see what it's all about and how you could score some free stuff!

Until next time ...
Stephanie